FastComments.com

Add Comments to GoHighLevel Sites

With FastComments we can easily add live commenting to any site built with GoHighLevel.

Note that this tutorial requires a FastComments account. It's recommended that you sign up first and then come back here. You can create an account here.

Signing in first will ensure the generated code snippets are already tied to your account.

GoHighLevel Membership Sites and Other Sites

This tutorial is split between two categories: Membership Sites and regular GoHighLevel Sites.

We start with the instructions for Membership Sites.

Step 1: Edit Course Internal Link

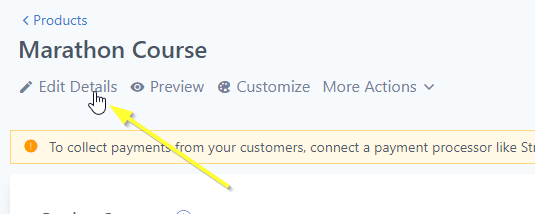
First, we're going to edit the settings for our course.

To do this, open the course, and click Edit Details.

Edit Course Details
Edit Course Details

Step 2: Open Advanced Settings Internal Link

Next, we need to open the Advanced settings:

Open Advanced Settings

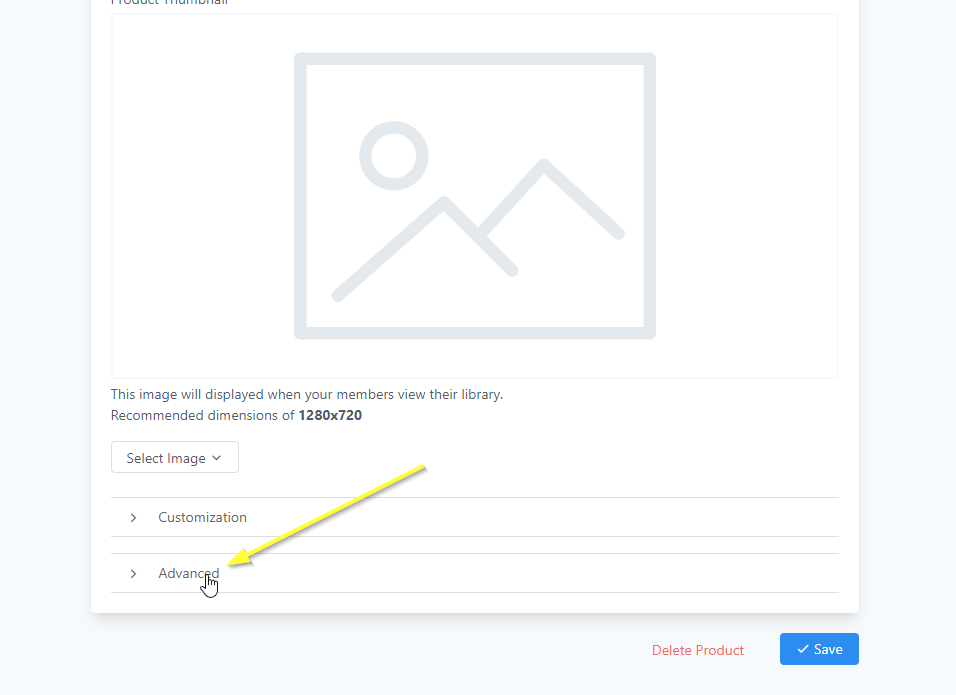
We'll be adding our code to the Tracking Code section. Go to that section and click Footer Code.

Step 3: Copy Code Internal Link

Now we're going to generate your custom FastComments code. Use the wizard below to configure how you want FastComments to work on your GoHighLevel site:

FastComments Configuration Wizard

Choose the type of commenting experience you want
How should the widget be placed on your pages?
Comma-separated URL patterns (leave empty for all pages)
Your FastComments tenant ID (use "demo" for testing)

Different Comment Box Types

You can configure the TYPE = 'commenting' line to switch the product used (for example you can change it to live for streaming chat or collab for collab chat).

Putting The Comment Box Where You Want

Let's say you want to put comment boxes on specific parts of the page and not the default locations. Change this line:

const TARGET_ELEMENT_ID = ''; // set to use target div mode

To:

const TARGET_ELEMENT_ID = 'fc_box'; // set to use target div mode

Then in the GHL editor, click the "code" button and add where you want the comments to go:

GoHighLevel FastComments Div
Copy Copy
1
2<div
3 id="fc_box"
4 type="commenting"
5 urlid="custom-chat-id"
6></div>
7

Different Comment Box Type Per-Page

Let's say you want users to highlight and discuss pieces of text, or use the streaming chat UI instead.

First follow the steps above in "Putting The Comment Box Where You Want".

Note in that small snippet there's type="commenting".

If you want to enable collab chat for example change type to type="collab".

Only Show On Specific Pages

If you don't set don't set TARGET_ELEMENT_ID, you can instead configure the VALID_PATTERNS variable, to set which URL routes the comments should show. By default, it will show on pages that contain /post in the URL.

Configuring Collab Chat

You can tell collab chat to only add collaborative functionality around HTML inside a specific area, for example, let's say you add the footer code above and then add this div in the post/page content to enable collab chat:

Collab Chat With Specified Content
Copy Copy
1
2<div
3 id="fc_box"
4 type="collab"
5 urlid="custom-chat-id"
6><p>This content will have collab chat!</p></div>
7

Then the paragraph element inside the <div> will have collab chat enabled, and nothing else on the page. If you don't put any content in the <div> then it will enable collab chat on the entire post body.
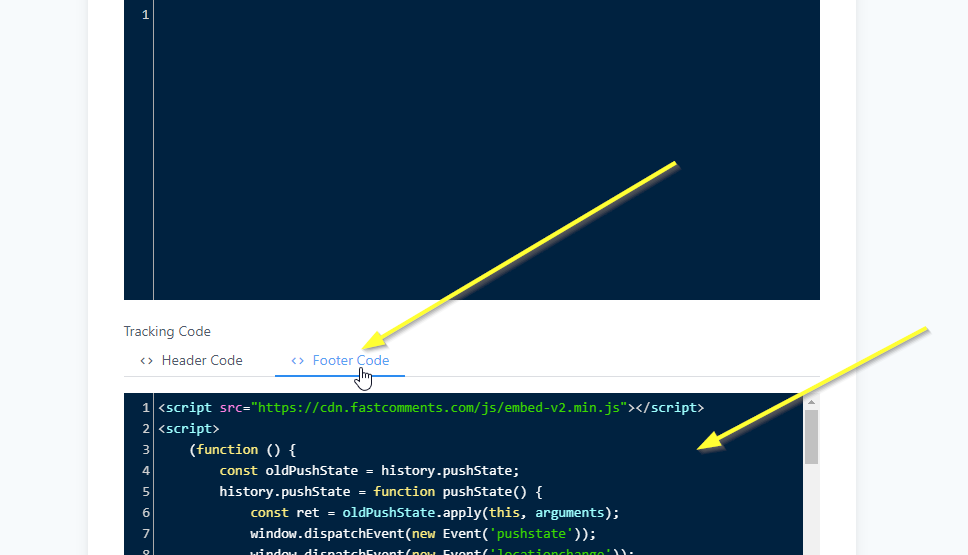
Step 4: Paste Code Internal Link

Now that we've copied our snippet, paste it in the Footer Code section as shown:
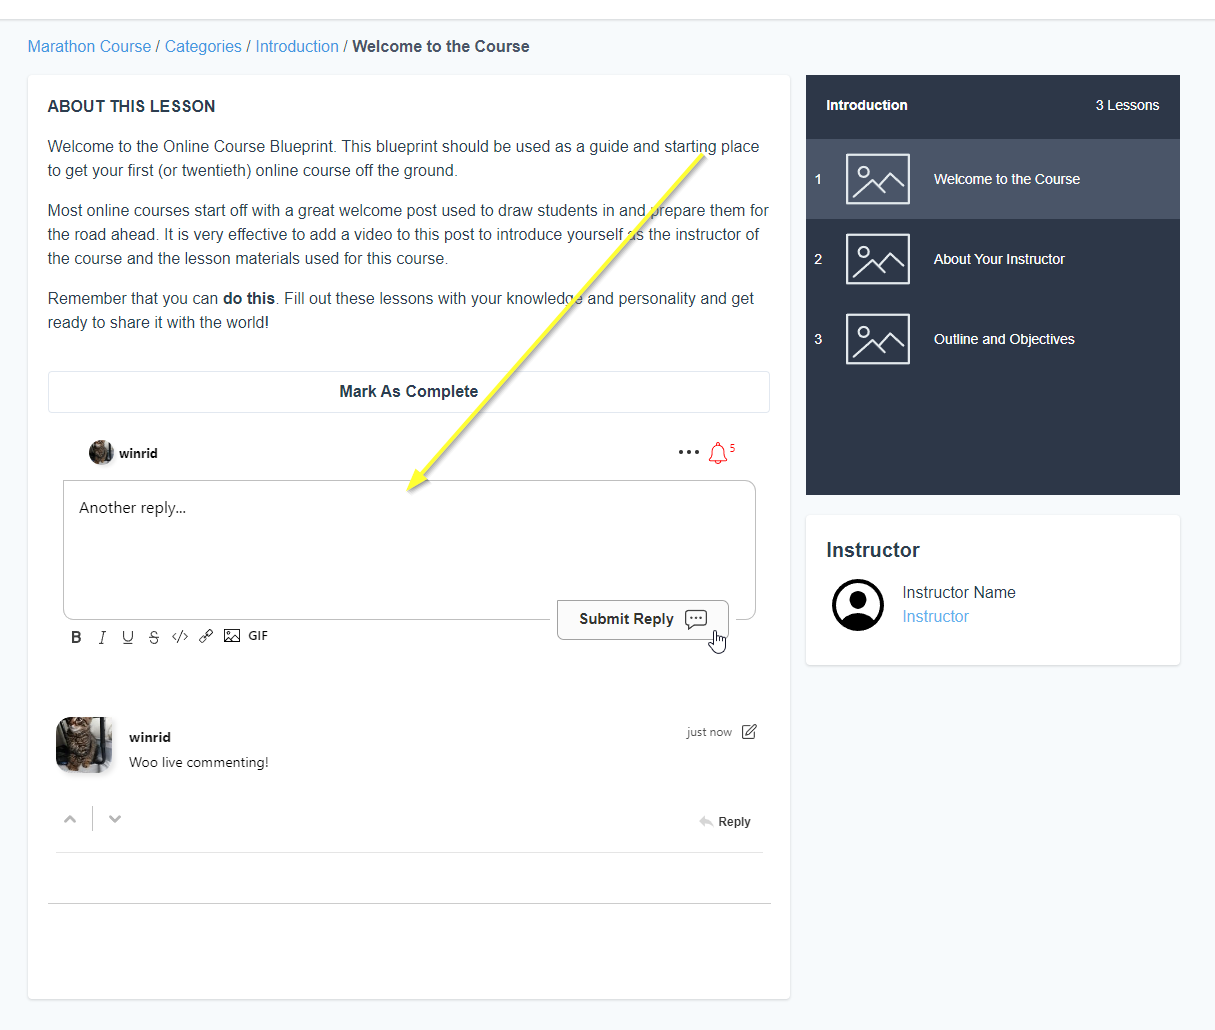
Paste Code
Paste Code

Member Site Success Internal Link

That's it! You should now have live commenting added to your GoHighLevel course.

Success
Success

If you've run into a permission denied error, or would like to customize FastComments, read on.

Member Site Customization Internal Link

FastComments is designed to be customized to match your site.

If you'd like to add custom styling, or tweak configuration, Checkout our Customization Documentation to learn how.

Step 1: Add Custom Code Element Internal Link

First, we're going to open the editor for the page of our site we want to add comments to.

Open Editor
Open Editor

Now find the place on the page where you want to add comments. Move your mouse toward the end of that area. A + icon will appear:

Add Section
Add Section

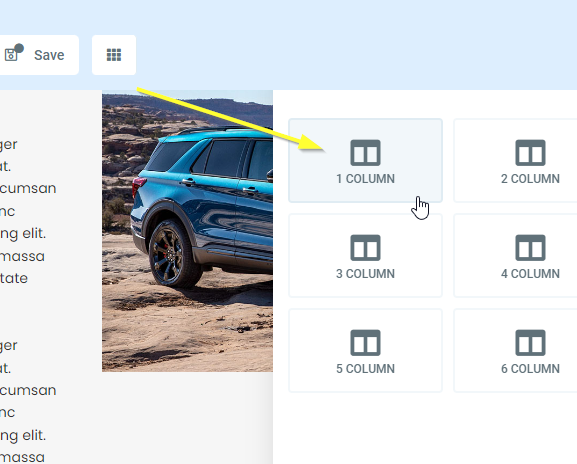
If we click that it asks us how many columns should the new section be. We'll select 1 COLUMN:

Add a Column
Add a Column

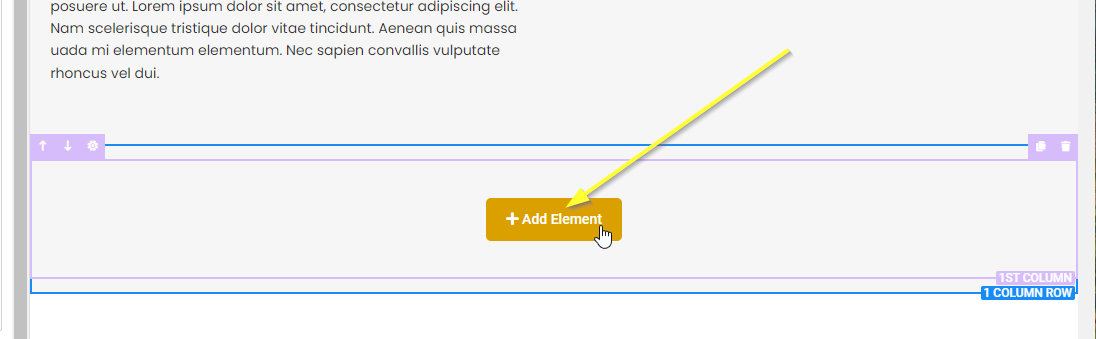
Now if you move your mouse over the new 1-column-row you'll have the option to add an element. Click that:

Add Element
Add Element

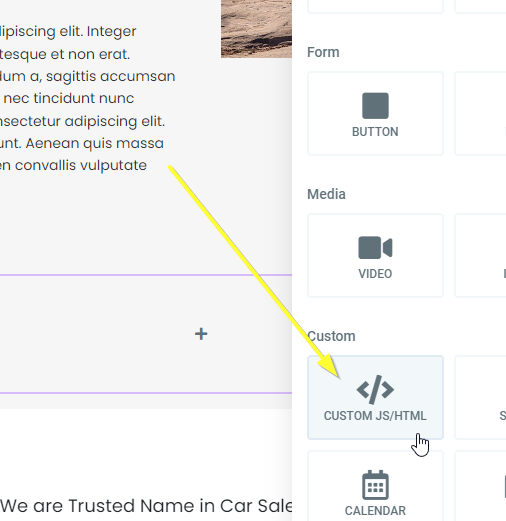
Scroll down and pick CUSTOM JS/HTML:

Select CUSTOM JS/HTML

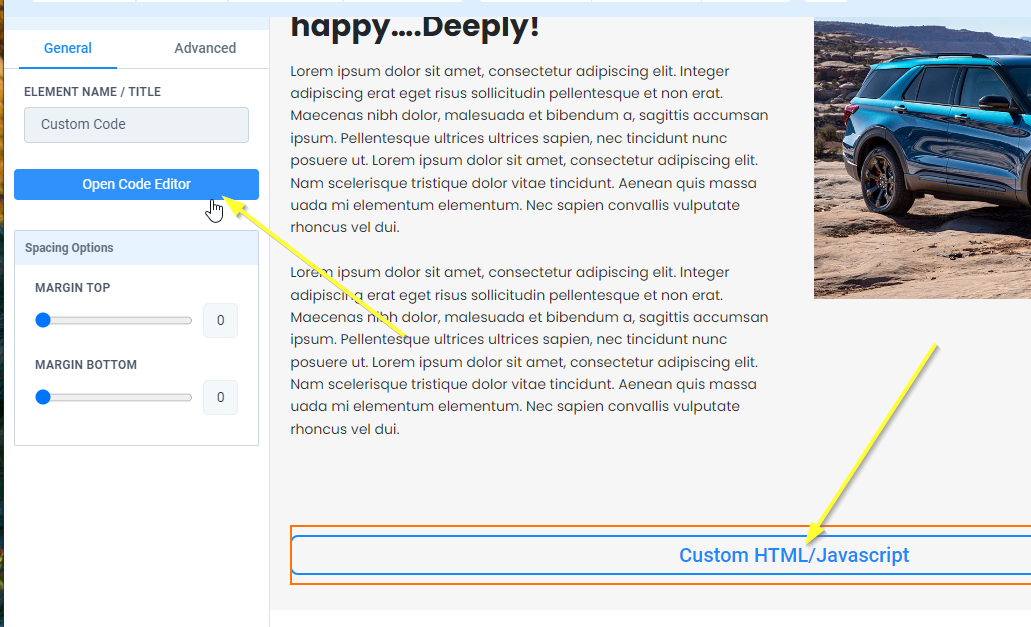
Now select our new element and click Open Code Editor on the left:

Open Code Editor
Open Code Editor

Step 2: Copy and Paste Code Internal Link

It's time to copy our code. Copy the following code:

GoHighLevel Site Comments Code
Copy Copy
1
2<script src="https://cdn.fastcomments.com/js/embed-v2.min.js"></script>
3<div id="fastcomments-widget"></div>
4<script>
5 (function () {
6 const tenantId = 'demo';
7 const SCRIPT_ID = 'fastcomments-embed';
8 const WIDGET_ID = 'fastcomments-widget';
9
10 let lastInstance;
11 let currentUrlId;
12 let rendered = false;
13
14 // History API modifications for SPA support
15 const oldPushState = history.pushState;
16 history.pushState = function pushState() {
17 const ret = oldPushState.apply(this, arguments);
18 window.dispatchEvent(new Event('pushstate'));
19 window.dispatchEvent(new Event('locationchange'));
20 return ret;
21 };
22
23 const oldReplaceState = history.replaceState;
24 history.replaceState = function replaceState() {
25 const ret = oldReplaceState.apply(this, arguments);
26 window.dispatchEvent(new Event('replacestate'));
27 window.dispatchEvent(new Event('locationchange'));
28 return ret;
29 };
30
31 window.addEventListener('popstate', () => {
32 window.dispatchEvent(new Event('locationchange'));
33 });
34
35 function getContainer() {
36 return document.getElementById(WIDGET_ID);
37 }
38
39 // Function to ensure script is loaded
40 function ensureScriptLoaded() {
41 return new Promise((resolve) => {
42 // Check if script tag already exists
43 let scriptTag = document.getElementById(SCRIPT_ID);
44
45 if (!scriptTag) {
46 console.log('FastComments: Script tag not found, adding dynamically...');
47 scriptTag = document.createElement('script');
48 scriptTag.id = SCRIPT_ID;
49 scriptTag.src = 'https://cdn.fastcomments.com/js/embed-v2.min.js';
50 scriptTag.async = true;
51
52 scriptTag.onload = () => {
53 console.log('FastComments: Script loaded successfully');
54 resolve();
55 };
56
57 scriptTag.onerror = () => {
58 console.error('FastComments: Failed to load script');
59 resolve(); // Resolve anyway to prevent hanging
60 };
61
62 document.head.appendChild(scriptTag);
63 } else if (window.FastCommentsUI) {
64 // Script tag exists and is already loaded
65 console.log('FastComments: Script already loaded');
66 resolve();
67 } else {
68 // Script tag exists but not ready yet
69 console.log('FastComments: Waiting for script to initialize...');
70 scriptTag.addEventListener('load', () => {
71 resolve();
72 });
73
74 // Fallback in case the script is already loading
75 const checkInterval = setInterval(() => {
76 if (window.FastCommentsUI) {
77 clearInterval(checkInterval);
78 resolve();
79 }
80 }, 100);
81
82 // Timeout after 10 seconds
83 setTimeout(() => {
84 clearInterval(checkInterval);
85 console.warn('FastComments: Script load timeout');
86 resolve();
87 }, 10000);
88 }
89 });
90 }
91
92 // Main render function
93 async function render() {
94 rendered = false;
95
96 // Ensure script is loaded before proceeding
97 await ensureScriptLoaded();
98
99 function tryNext() {
100 if (rendered) {
101 return;
102 }
103
104 const container = getContainer();
105
106 if (container) {
107 // Double-check if FastCommentsUI is available
108 if (!window.FastCommentsUI) {
109 console.log('FastComments: not ready, waiting...');
110 setTimeout(tryNext, 300);
111 return;
112 }
113
114 console.log('FastComments: Target element found, initializing...');
115
116 // Get current URL as urlId
117 const newUrlId = window.location.pathname;
118
119 // Check if we need to re-render (urlId changed or first render)
120 if (currentUrlId !== newUrlId || !lastInstance) {
121 currentUrlId = newUrlId;
122
123 // Destroy previous instance if exists
124 if (lastInstance) {
125 lastInstance.destroy();
126 // Clear the container content
127 container.innerHTML = '';
128 }
129
130 // Prepare config
131 const config = {
132 tenantId: tenantId,
133 urlId: newUrlId
134 };
135
136 console.log('FastComments: Using urlId:', newUrlId);
137
138 // Initialize FastComments
139 lastInstance = window.FastCommentsUI(container, config);
140 rendered = true;
141 } else {
142 console.log('FastComments: Already rendered with same urlId');
143 rendered = true;
144 }
145
146 // Monitor if container gets removed or URL changes
147 const interval = setInterval(function () {
148 const currentContainer = getContainer();
149 if (!currentContainer) {
150 console.log('FastComments: Container removed, will retry...');
151 rendered = false;
152 currentUrlId = null;
153 tryNext();
154 clearInterval(interval);
155 } else {
156 const newUrlId = window.location.pathname;
157 if (newUrlId !== currentUrlId) {
158 console.log('FastComments: URL changed, re-rendering...');
159 rendered = false;
160 tryNext();
161 clearInterval(interval);
162 }
163 }
164 }, 1000);
165 } else {
166 console.log('FastComments: Target element not found, waiting...');
167 setTimeout(tryNext, 300);
168 }
169 }
170
171 tryNext();
172 }
173
174 // Initial render when DOM is ready
175 if (document.readyState === 'loading') {
176 document.addEventListener('DOMContentLoaded', render);
177 } else {
178 render();
179 }
180
181 // Re-render on location change (for SPAs)
182 window.addEventListener('locationchange', function () {
183 console.log('FastComments: Location changed, updating...');
184 render();
185 });
186 })();
187</script>
188

Paste that in the editor window we opened:

Paste Code
Paste Code

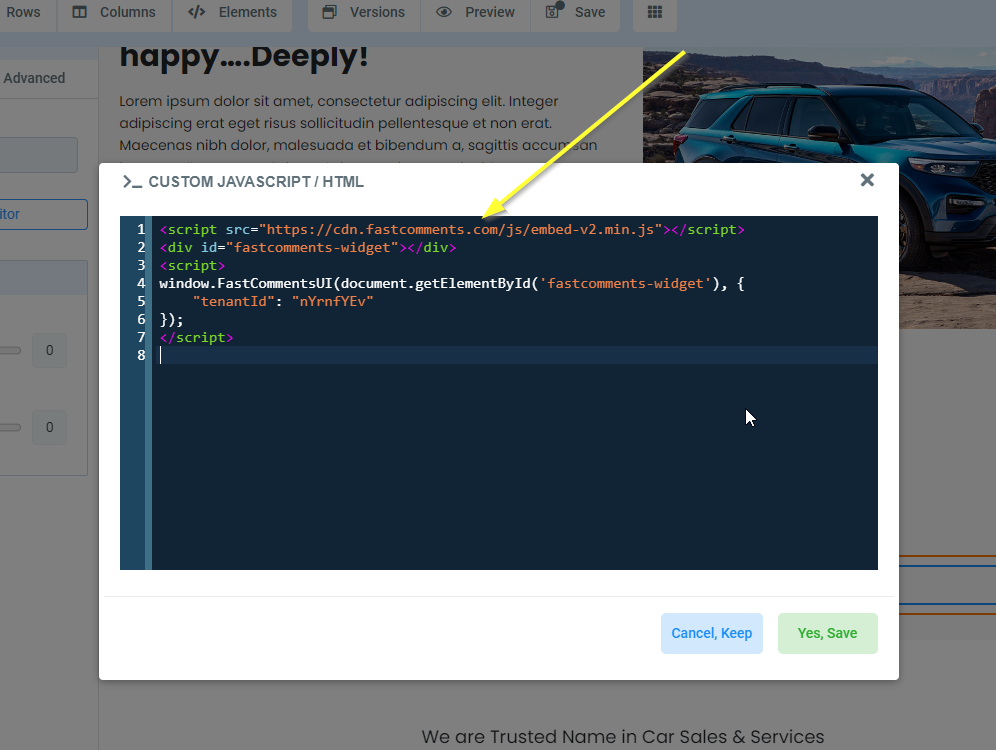
We can now click Yes, Save on the bottom right of that window.

At the top of the page now click Save and then Preview.
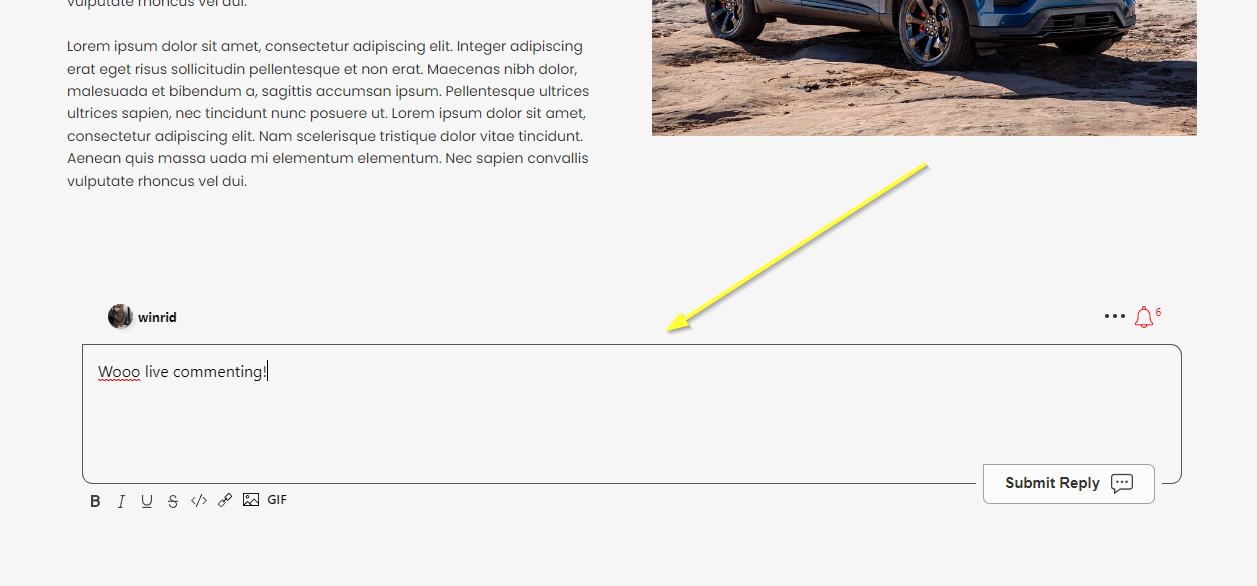
Site Success Internal Link

That's it! You should now have live commenting added to your GoHighLevel site.

Success
Success

If you've run into a permission denied error, or would like to customize FastComments, read on.

Site Customization Internal Link

FastComments is designed to be customized to match your site.

If you'd like to add custom styling, or tweak configuration, Checkout our Customization Documentation to learn how.

In Conclusion

If for any reason the provided steps or code is not working, please let us know.