FastComments.com

GoHighLevel 사이트에 댓글 추가하기

FastComments를 사용하면 GoHighLevel로 구축된 모든 사이트에 실시간 댓글 기능을 쉽게 추가할 수 있습니다.

이 튜토리얼은 FastComments 계정이 필요합니다. 먼저 가입한 다음 이곳으로 돌아오는 것을 권장합니다. 여기에서 계정을 생성할 수 있습니다.

먼저 로그인하면 생성된 코드 스니펫이 이미 귀하의 계정과 연결되어 있게 됩니다.

GoHighLevel 멤버십 사이트 및 기타 사이트

이 튜토리얼은 멤버십 사이트와 일반 GoHighLevel 사이트의 두 가지 범주로 나뉩니다.

먼저 멤버십 사이트에 대한 지침부터 시작합니다.


1단계: 코스 편집 Internal Link


먼저, 코스의 설정을 편집하겠습니다.

To do this, open the course, and click Edit Details.
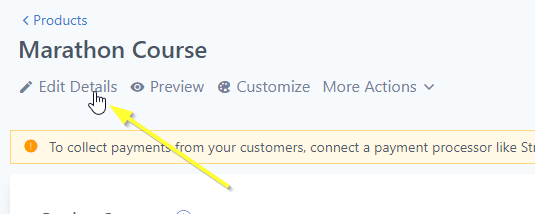
코스 세부 정보 편집
코스 세부 정보 편집

2단계: 고급 설정 열기 Internal Link

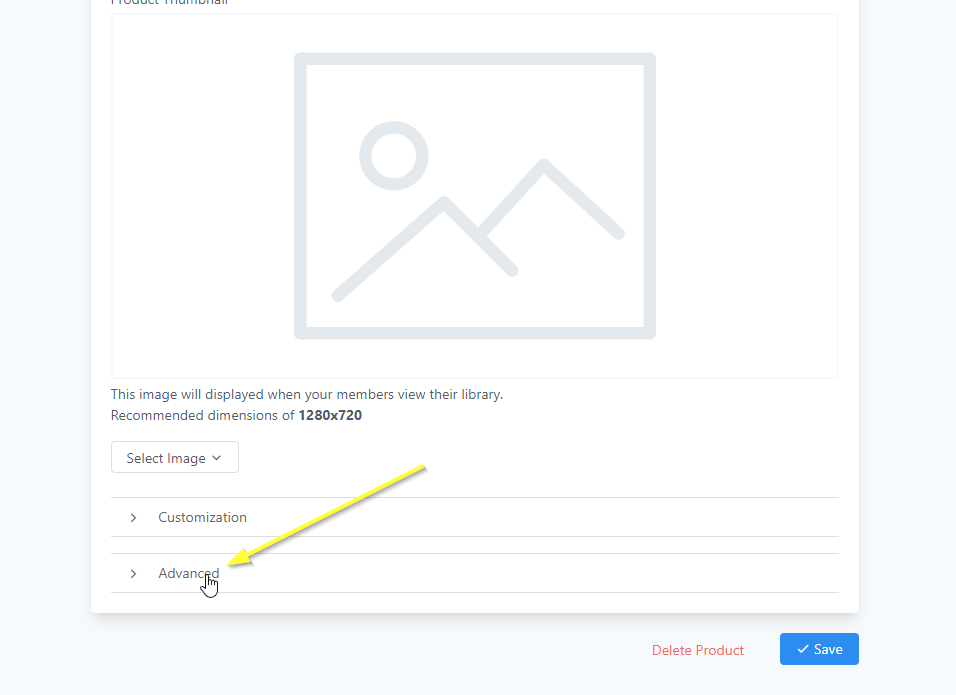
다음으로, Advanced 설정을 열어야 합니다:

고급 설정 열기
고급 설정 열기

코드는 Tracking Code 섹션에 추가할 예정입니다. 해당 섹션으로 이동한 다음 Footer Code를 클릭하세요.

3단계: 코드 복사 Internal Link

이제 맞춤 FastComments 코드를 생성합니다. 아래 마법사를 사용하여 GoHighLevel 사이트에서 FastComments가 작동하는 방식을 구성하세요:

FastComments Configuration Wizard

Choose the type of commenting experience you want
How should the widget be placed on your pages?
Comma-separated URL patterns (leave empty for all pages)
Your FastComments tenant ID (use "demo" for testing)

다른 댓글 박스 유형

사용되는 제품을 전환하려면 TYPE = 'commenting' 줄을 구성할 수 있습니다 (예: 스트리밍 채팅은 live로, 협업 채팅은 collab로 변경할 수 있습니다).

댓글 박스를 원하는 위치에 배치하기

페이지의 특정 부분에만 댓글 박스를 넣고 기본 위치에는 넣지 않으려는 경우를 가정해봅시다. 이 줄을 변경하세요:

const TARGET_ELEMENT_ID = ''; // 타겟 div 모드 사용을 위해 설정

다음으로:

const TARGET_ELEMENT_ID = 'fc_box'; // 타겟 div 모드 사용을 위해 설정

그런 다음 GHL 에디터에서 "code" 버튼을 클릭하고 댓글을 표시할 위치에 다음을 추가하세요:

GoHighLevel FastComments DIV(영역)
Copy Copy
1
2<div
3 id="fc_box"
4 type="commenting"
5 urlid="custom-chat-id"
6></div>
7

페이지별로 다른 댓글 박스 유형

사용자가 텍스트의 일부를 강조 표시하고 토론하게 하거나 대신 스트리밍 채팅 UI를 사용하게 하려는 경우를 가정해봅시다.

먼저 위의 "댓글 박스를 원하는 위치에 배치하기" 섹션의 단계를 따르세요.

작은 스니펫에 type="commenting"이 있다는 점을 참고하세요.

예를 들어 collab 채팅을 활성화하려면 type="collab"로 변경하세요.

특정 페이지에만 표시

TARGET_ELEMENT_ID를 설정하지 않으면 대신 VALID_PATTERNS 변수를 구성하여 댓글을 표시할 URL 경로를 설정할 수 있습니다. 기본적으로 URL에 /post가 포함된 페이지에 표시됩니다.

Collab 채팅 구성하기

Collab 채팅이 특정 영역 내의 HTML에 대해서만 협업 기능을 추가하도록 지정할 수 있습니다. 예를 들어 위의 푸터 코드를 추가한 다음 게시물/페이지 내용에 이 div를 추가하여 collab 채팅을 활성화한다고 가정해보겠습니다:

지정된 콘텐츠로 Collab Chat
Copy Copy
1
2<div
3 id="fc_box"
4 type="collab"
5 urlid="custom-chat-id"
6><p>This content will have collab chat!</p></div>
7

그런 다음 <div> 내부의 단락 요소에는 collab 채팅이 활성화되며 페이지의 다른 부분에는 영향을 주지 않습니다. <div>에 아무 콘텐츠도 넣지 않으면 게시물 본문 전체에 collab 채팅이 활성화됩니다.

4단계: 코드 붙여넣기 Internal Link

스니펫을 복사했으니, 아래와 같이 Footer Code 섹션에 붙여넣으세요:
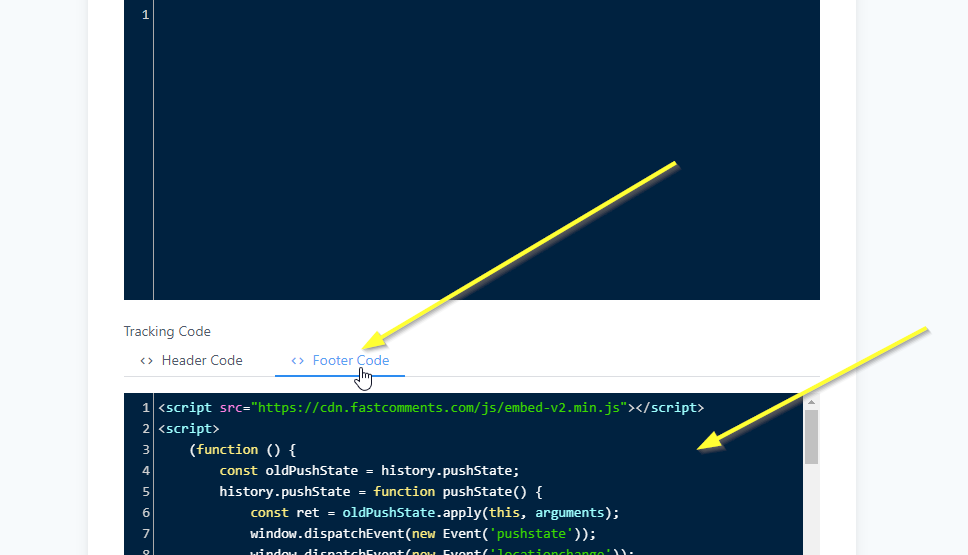
Paste Code
Paste Code

멤버 사이트 설치 성공 Internal Link


이게 전부입니다! 이제 GoHighLevel 코스에 실시간 댓글 기능이 추가되어 있어야 합니다.
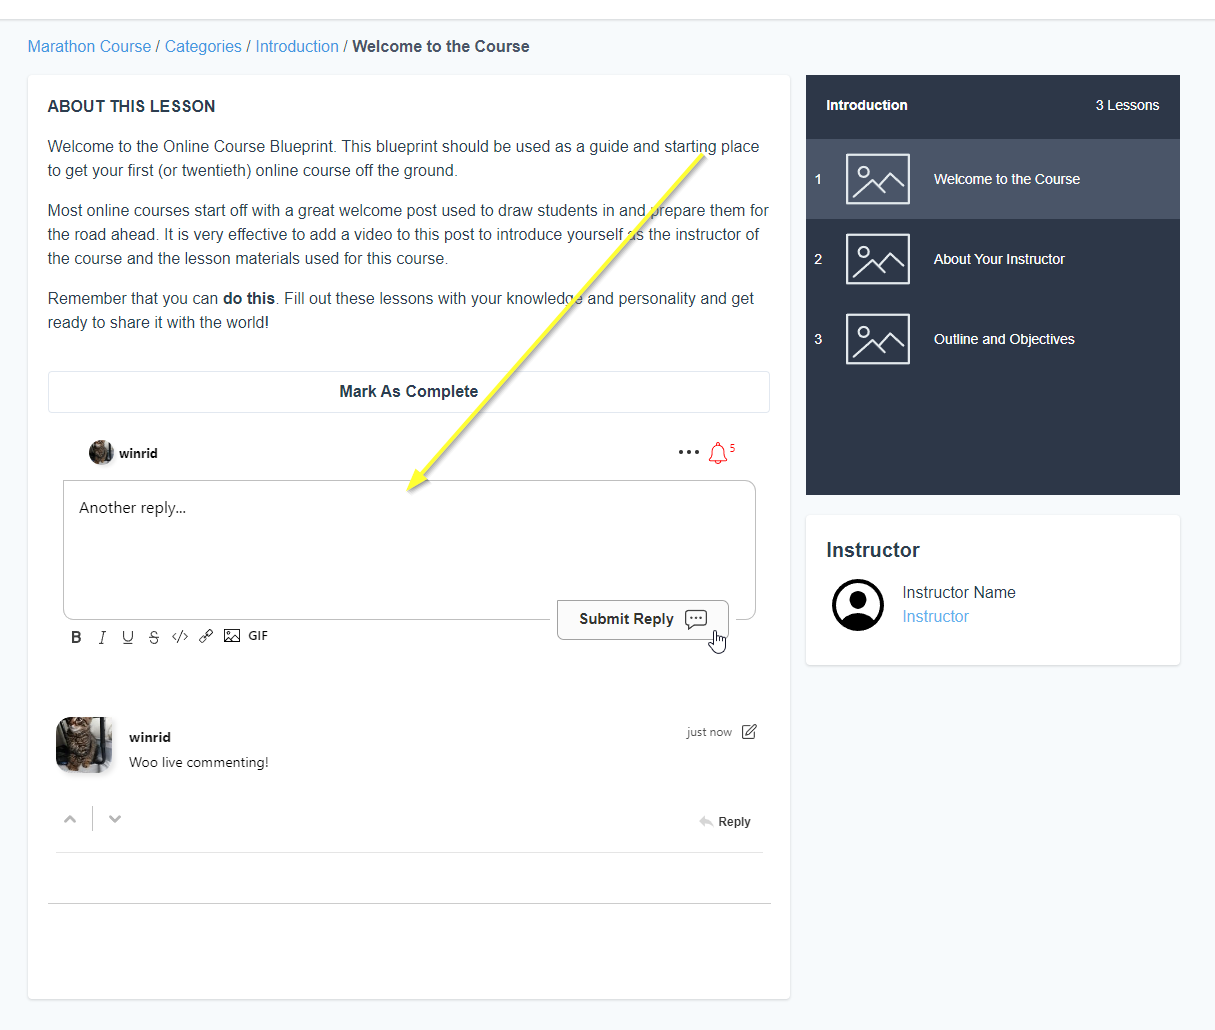
성공
성공

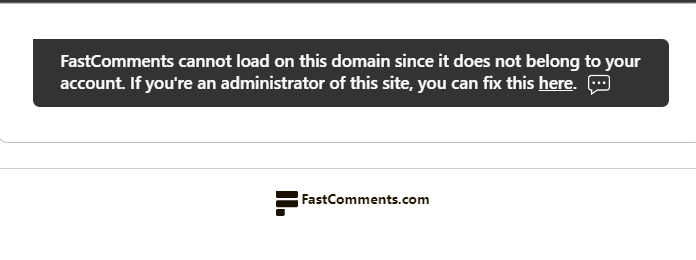
권한 거부 오류가 발생했거나 FastComments를 사용자 지정하려면 계속 읽으세요.


멤버 사이트 맞춤 설정 Internal Link

FastComments는 귀하의 사이트에 맞게 사용자 지정할 수 있도록 설계되었습니다.

맞춤 스타일을 추가하거나 구성을 조정하려면, 사용자 지정 및 구성 문서에서 방법을 확인하세요.


1단계: 커스텀 코드 요소 추가 Internal Link

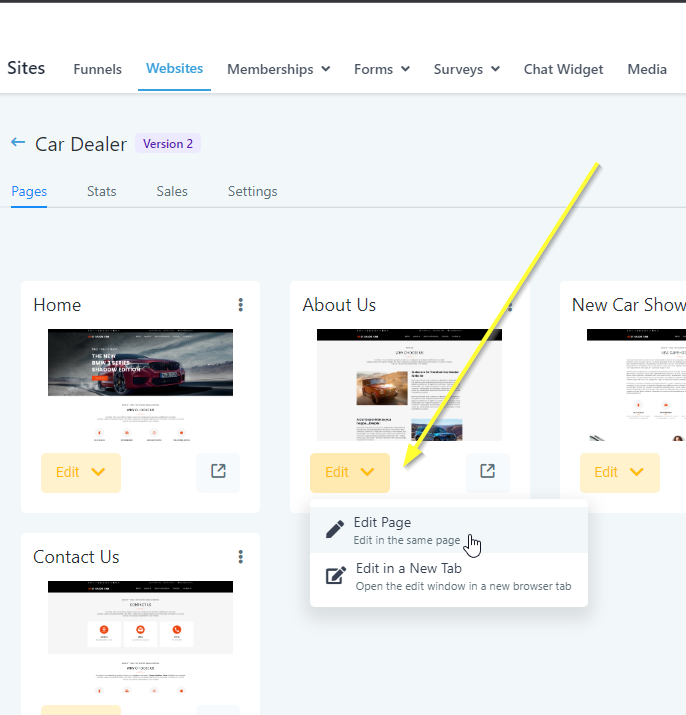
먼저, 댓글을 추가하려는 사이트 페이지의 편집기를 엽니다.

편집기 열기
편집기 열기

이제 페이지에서 댓글을 추가하려는 위치를 찾습니다. 해당 영역의 끝쪽으로 마우스를 이동하면 + 아이콘이 나타납니다:
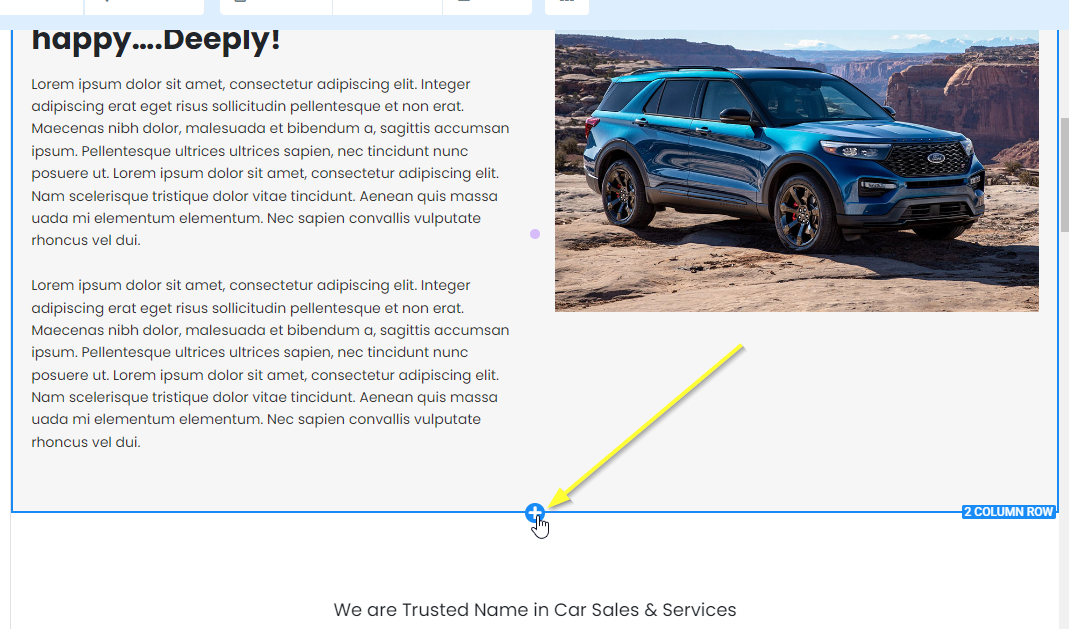
섹션 추가
섹션 추가

이를 클릭하면 새 섹션의 열 수를 묻습니다. 1 COLUMN을 선택합니다:
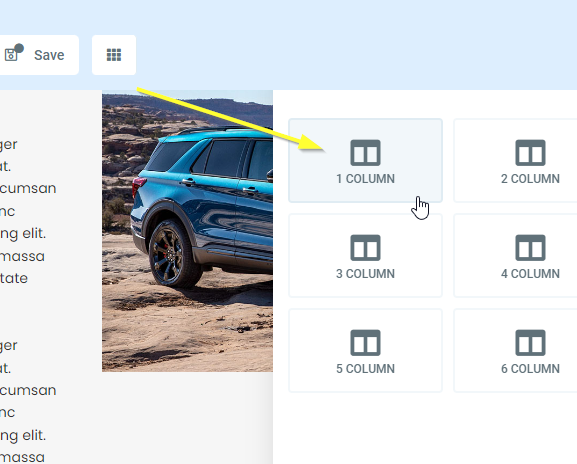
열 추가
열 추가

이제 새 1열 행 위로 마우스를 이동하면 요소를 추가할 수 있는 옵션이 표시됩니다. 그것을 클릭하세요:
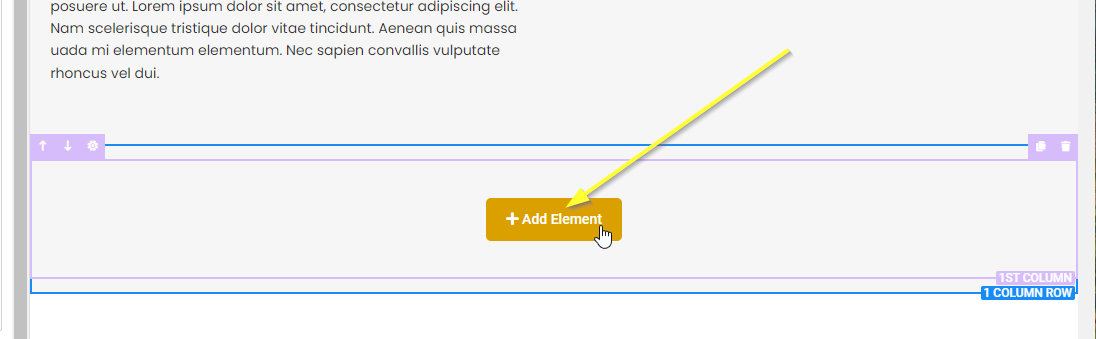
요소 추가
요소 추가

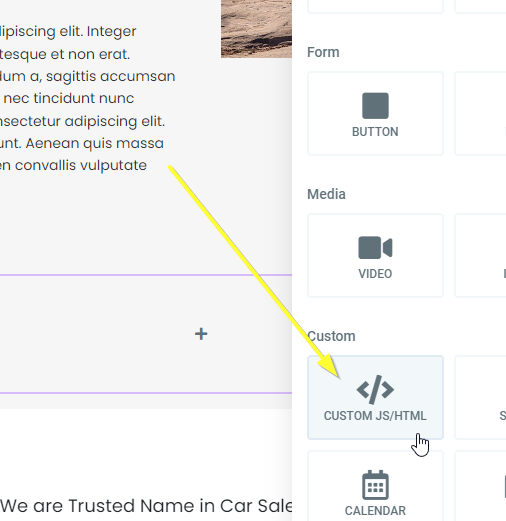
아래로 스크롤하여 CUSTOM JS/HTML을 선택하세요:

CUSTOM JS/HTML 선택
CUSTOM JS/HTML 선택

이제 새 요소를 선택하고 왼쪽의 Open Code Editor를 클릭하세요:
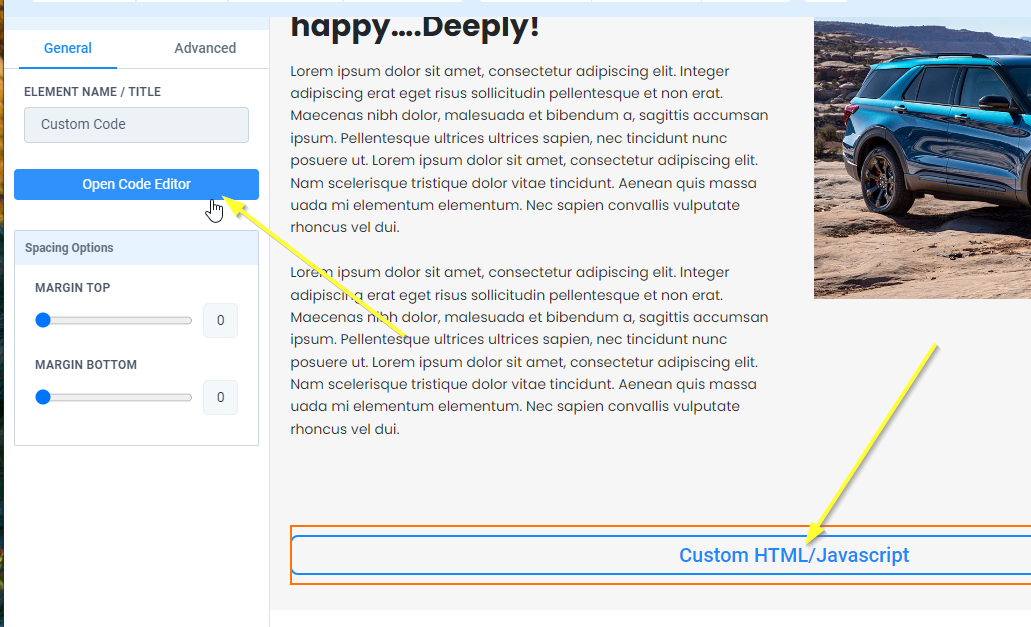
코드 편집기 열기
코드 편집기 열기

2단계: 코드 복사 및 붙여넣기 Internal Link

이제 코드를 복사할 차례입니다. 다음 코드를 복사하세요:

GoHighLevel 사이트 댓글 코드
Copy Copy
1
2<script src="https://cdn.fastcomments.com/js/embed-v2.min.js"></script>
3<div id="fastcomments-widget"></div>
4<script>
5 (function () {
6 const tenantId = 'demo';
7 const SCRIPT_ID = 'fastcomments-embed';
8 const WIDGET_ID = 'fastcomments-widget';
9
10 let lastInstance;
11 let currentUrlId;
12 let rendered = false;
13
14 // SPA 지원을 위한 History API 수정
15 const oldPushState = history.pushState;
16 history.pushState = function pushState() {
17 const ret = oldPushState.apply(this, arguments);
18 window.dispatchEvent(new Event('pushstate'));
19 window.dispatchEvent(new Event('locationchange'));
20 return ret;
21 };
22
23 const oldReplaceState = history.replaceState;
24 history.replaceState = function replaceState() {
25 const ret = oldReplaceState.apply(this, arguments);
26 window.dispatchEvent(new Event('replacestate'));
27 window.dispatchEvent(new Event('locationchange'));
28 return ret;
29 };
30
31 window.addEventListener('popstate', () => {
32 window.dispatchEvent(new Event('locationchange'));
33 });
34
35 function getContainer() {
36 return document.getElementById(WIDGET_ID);
37 }
38
39 // 스크립트가 로드되었는지 확인하는 함수
40 function ensureScriptLoaded() {
41 return new Promise((resolve) => {
42 // 스크립트 태그가 이미 존재하는지 확인
43 let scriptTag = document.getElementById(SCRIPT_ID);
44
45 if (!scriptTag) {
46 console.log('FastComments: Script tag not found, adding dynamically...');
47 scriptTag = document.createElement('script');
48 scriptTag.id = SCRIPT_ID;
49 scriptTag.src = 'https://cdn.fastcomments.com/js/embed-v2.min.js';
50 scriptTag.async = true;
51
52 scriptTag.onload = () => {
53 console.log('FastComments: Script loaded successfully');
54 resolve();
55 };
56
57 scriptTag.onerror = () => {
58 console.error('FastComments: Failed to load script');
59 resolve(); // 대기 상태를 방지하기 위해 어쨌든 resolve 호출
60 };
61
62 document.head.appendChild(scriptTag);
63 } else if (window.FastCommentsUI) {
64 // 스크립트 태그가 존재하고 이미 로드된 경우
65 console.log('FastComments: Script already loaded');
66 resolve();
67 } else {
68 // 스크립트 태그는 존재하지만 아직 준비되지 않은 경우
69 console.log('FastComments: Waiting for script to initialize...');
70 scriptTag.addEventListener('load', () => {
71 resolve();
72 });
73
74 // 스크립트가 이미 로드 중인 경우의 대체 처리
75 const checkInterval = setInterval(() => {
76 if (window.FastCommentsUI) {
77 clearInterval(checkInterval);
78 resolve();
79 }
80 }, 100);
81
82 // 10초 후 타임아웃
83 setTimeout(() => {
84 clearInterval(checkInterval);
85 console.warn('FastComments: Script load timeout');
86 resolve();
87 }, 10000);
88 }
89 });
90 }
91
92 // 주요 렌더링 함수
93 async function render() {
94 rendered = false;
95
96 // 진행하기 전에 스크립트가 로드되었는지 확인
97 await ensureScriptLoaded();
98
99 function tryNext() {
100 if (rendered) {
101 return;
102 }
103
104 const container = getContainer();
105
106 if (container) {
107 // FastCommentsUI가 사용 가능한지 재확인
108 if (!window.FastCommentsUI) {
109 console.log('FastComments: not ready, waiting...');
110 setTimeout(tryNext, 300);
111 return;
112 }
113
114 console.log('FastComments: Target element found, initializing...');
115
116 // 현재 URL을 urlId로 가져옴
117 const newUrlId = window.location.pathname;
118
119 // 다시 렌더링이 필요한지 확인 (urlId가 변경되었거나 처음 렌더링인 경우)
120 if (currentUrlId !== newUrlId || !lastInstance) {
121 currentUrlId = newUrlId;
122
123 // 이전 인스턴스가 존재하면 제거
124 if (lastInstance) {
125 lastInstance.destroy();
126 // 컨테이너 내용을 비움
127 container.innerHTML = '';
128 }
129
130 // 구성 설정 준비
131 const config = {
132 tenantId: tenantId,
133 urlId: newUrlId
134 };
135
136 console.log('FastComments: Using urlId:', newUrlId);
137
138 // FastComments 초기화
139 lastInstance = window.FastCommentsUI(container, config);
140 rendered = true;
141 } else {
142 console.log('FastComments: Already rendered with same urlId');
143 rendered = true;
144 }
145
146 // 컨테이너가 제거되거나 URL이 변경되는지 모니터링
147 const interval = setInterval(function () {
148 const currentContainer = getContainer();
149 if (!currentContainer) {
150 console.log('FastComments: Container removed, will retry...');
151 rendered = false;
152 currentUrlId = null;
153 tryNext();
154 clearInterval(interval);
155 } else {
156 const newUrlId = window.location.pathname;
157 if (newUrlId !== currentUrlId) {
158 console.log('FastComments: URL changed, re-rendering...');
159 rendered = false;
160 tryNext();
161 clearInterval(interval);
162 }
163 }
164 }, 1000);
165 } else {
166 console.log('FastComments: Target element not found, waiting...');
167 setTimeout(tryNext, 300);
168 }
169 }
170
171 tryNext();
172 }
173
174 // DOM이 준비되었을 때 초기 렌더링
175 if (document.readyState === 'loading') {
176 document.addEventListener('DOMContentLoaded', render);
177 } else {
178 render();
179 }
180
181 // 위치 변경 시 재렌더링 (SPA용)
182 window.addEventListener('locationchange', function () {
183 console.log('FastComments: Location changed, updating...');
184 render();
185 });
186 })();
187</script>
188

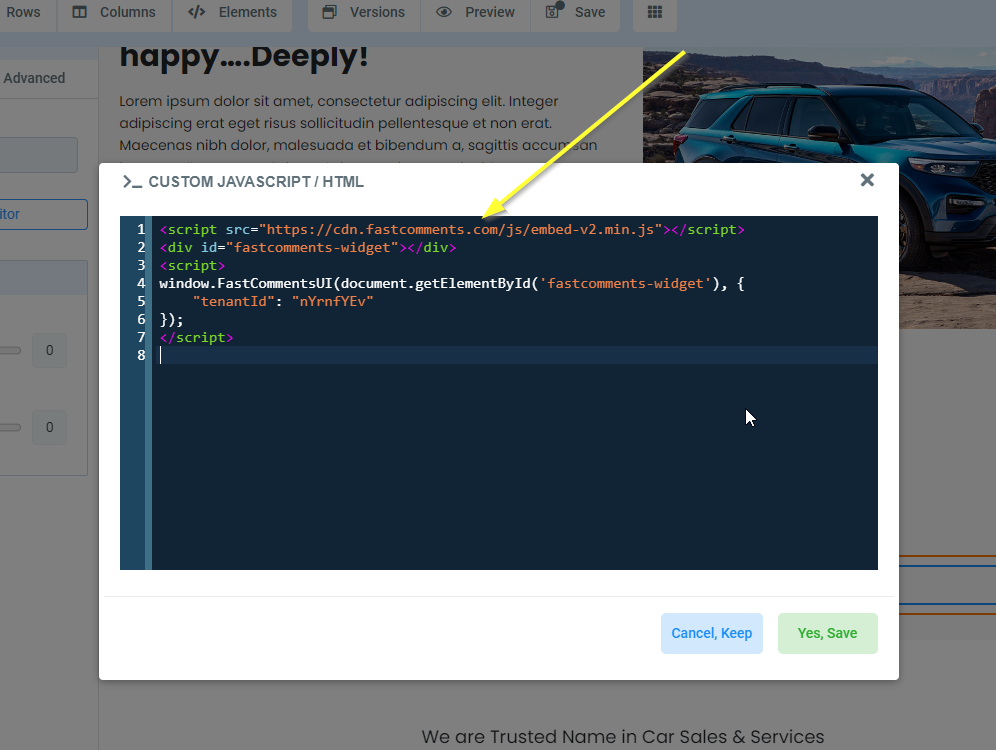
열었던 편집기 창에 붙여넣으세요:

코드 붙여넣기
코드 붙여넣기

이제 그 창의 오른쪽 아래에서 Yes, Save를 클릭할 수 있습니다.

페이지 상단에서 Save를 클릭한 다음 Preview를 클릭하세요.

사이트 설치 성공 Internal Link

이게 전부입니다! 이제 GoHighLevel 사이트에 라이브 댓글 기능이 추가되었습니다.
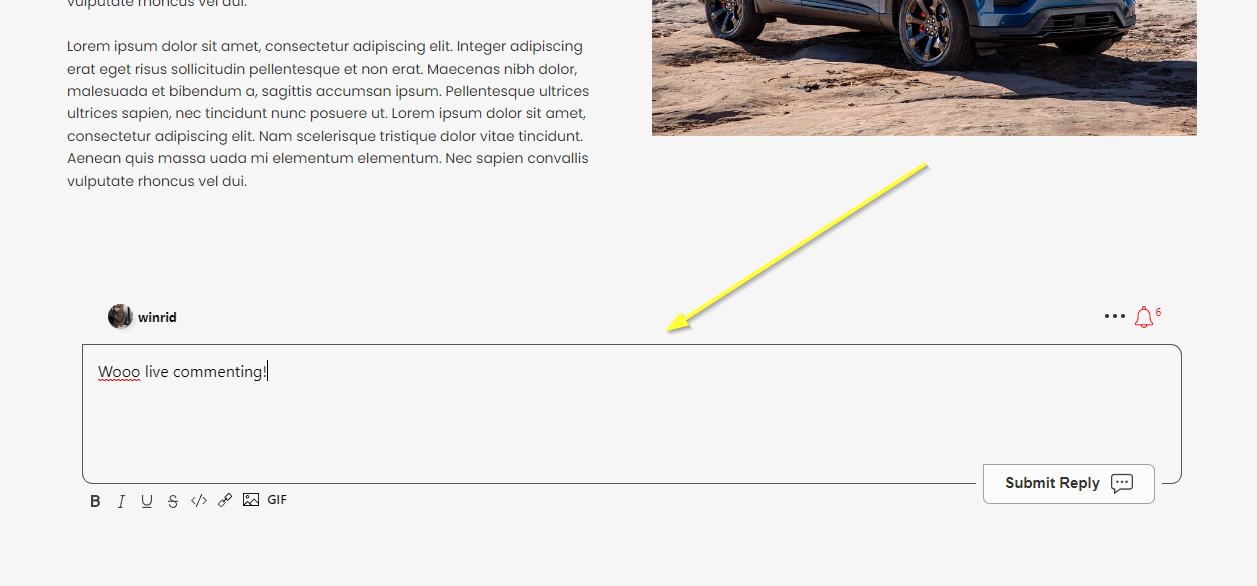
성공
성공

권한 거부 오류가 발생했거나 FastComments를 맞춤 설정하려면 계속 읽으세요.


사이트 맞춤 설정 Internal Link


FastComments는 사이트에 맞춰 맞춤 설정할 수 있도록 설계되었습니다.

사용자 정의 스타일을 추가하거나 구성을 조정하려면 맞춤 설정 문서를 확인하세요.


결론

제공된 단계나 코드가 어떤 이유로든 작동하지 않는 경우, 저희에게 알려주세요.