
FastComments では、コメントがシステムに追加、更新、または削除されるたびに API エンドポイントを呼び出すことができます。
これは HTTP/HTTPS を介した非同期 Webhook によって実現します。
ウェブフックとは 
Webhookは、2つのシステム間の仕組み、または統合であり、"producer" (FastComments) がイベントを発生させ "consumer" (あなた) がAPIコールでそれを受け取るものです。
対応イベントとリソース
FastComments は Comment リソースに対してのみウェブフックをサポートしています。
コメントの作成、削除、更新時のウェブフックをサポートしています。
これらはそれぞれシステム内で別個のイベントと見なされるため、ウェブフックイベントのセマンティクスと構造が異なります。
ローカル開発のセットアップ
For Local development, use a tool like ngrok.
ローカル開発には、ngrok のようなツールを使用してください。
In order to simplify keeping the system secure, local development follows the same process as setting up and securing other environments.
システムのセキュリティを簡素化するために、ローカル開発は他の環境のセットアップおよび保護と同じプロセスに従います。
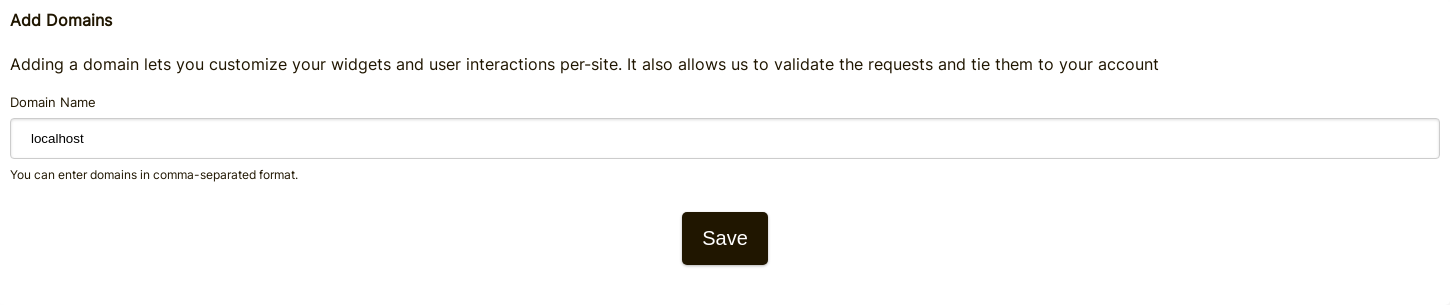
Step 1: Add "localhost" to domains in your account.
ステップ 1: アカウントのドメインに "localhost" を追加する
Add "localhost" as a domain here.
"localhost" を こちら でドメインとして追加してください。

Step 2: Pick an API Key
ステップ 2: API Key を選択する
We're going to be adding webhook configuration for your domain, so we'll need an API key. You can do that here.
ドメイン用にウェブフックの設定を追加するため、API Key が必要です。こちらで作成できます。

Under "Associate with domain" - select your "localhost" domain.
"Associate with domain" の項目で、"localhost" ドメインを選択してください。
NOTE: Alternatively, you can use one API Secret for all testing activity and staging environments. Simply add an API Secret for "All Domains", and give it a name like "test".
注意: 代替として、すべてのテスト活動およびステージング環境に対して1つの API Secret を使用することもできます。単に "All Domains" 用の API Secret を追加し、名前を "test" のように付けてください。
Ensure you have an API Secret defined for your production domain(s). Events for all other domains will use the wildcard (testing) secret.
本番ドメインには必ず API Secret を定義してください。その他のすべてのドメインのイベントはワイルドカード(テスト)シークレットを使用します。
Step 3: Add Your Webhook
ステップ 3: ウェブフックを追加する
While running ngrok or similar tool, set the value for "localhost" here.
ngrok 等のツールを実行している間に、"localhost" の値を こちら で設定してください。
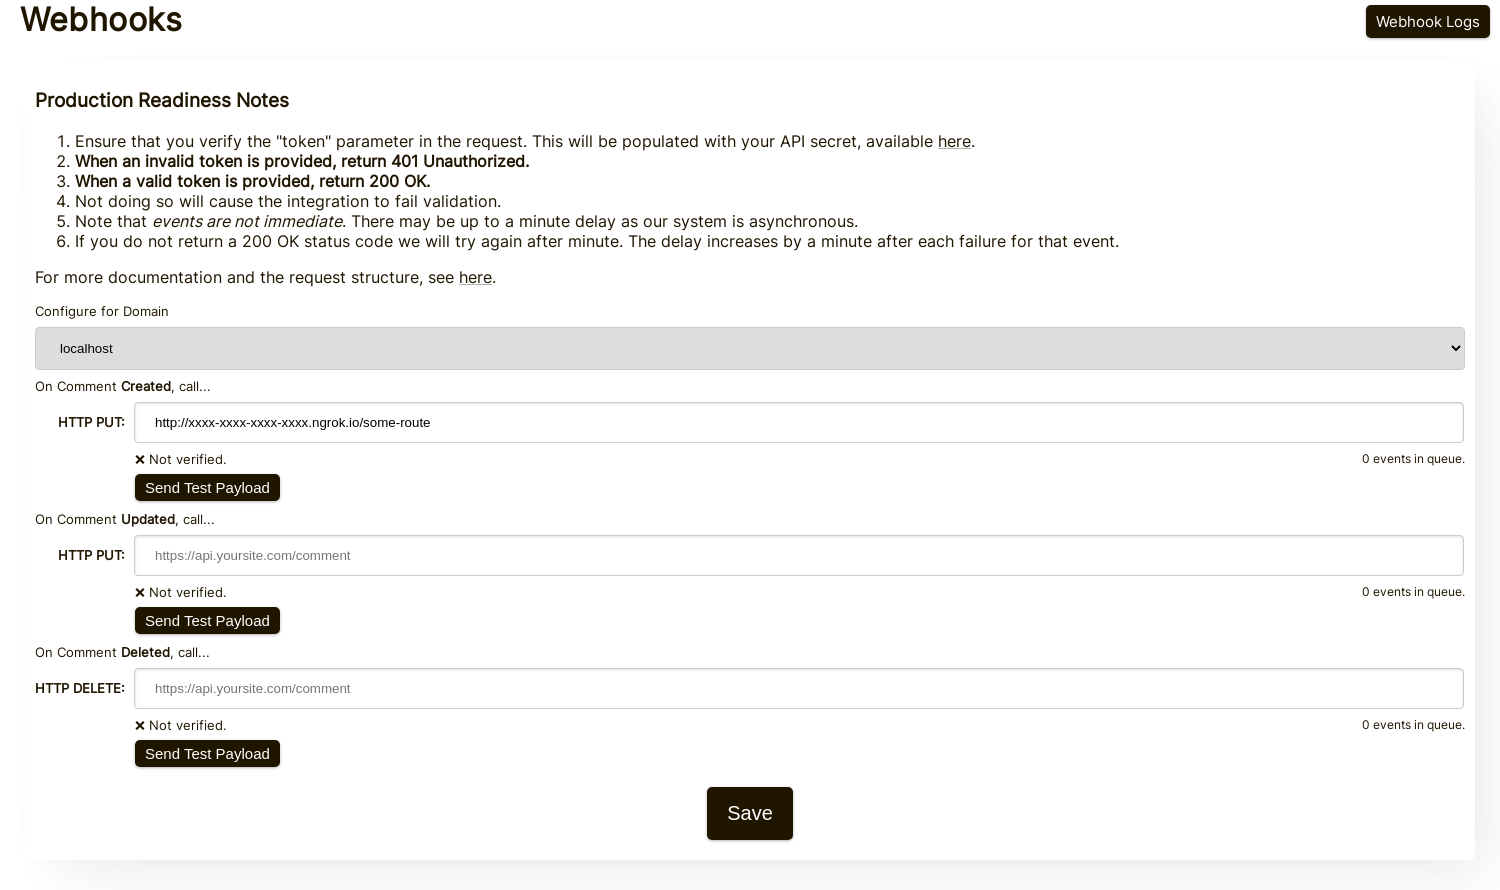
When clicking Send Test Payload, we will send two test events to check that you validate the API key.
Send Test Payload をクリックすると、API Key の検証を確認するために 2 件のテストイベントを送信します。
Once it validates, hit Save.
検証が完了したら、Save を押してください。
Step 4: Add A Comment
ステップ 4: コメントを追加する
Now you can add, edit, or delete comments and should see us call your local development machine with the events, using your testing API key. There may be up to 30 seconds delay for the events to reach your machine.
これでコメントの追加、編集、削除が可能になり、テスト用 API Key を使用してイベントでローカル開発マシンにコールが来るのが確認できるはずです。イベントがマシンに届くまでに最大で 30 秒の遅延が発生する場合があります。
セットアップ
本番と同じ手順を localhost に対して行ってください。本番ドメインと API Secrets が設定されていることを確認してください。
まず、Webhooks admin に移動してください。これは Manage Data -> Webhooks からアクセスできます。
設定ページは次のように表示されます:

このページで、各種コメントイベントごとのエンドポイントを指定できます。
各イベントタイプごとに、統合が正しく設定されていることを確認するために必ず「Send Test Payload」をクリックしてください。詳しくは次のセクション「Testing」を参照してください。
テスト
In the Webhooks admin there are Send Test Payload buttons for each event type (Create, Update, Delete). The Create and Update events send a dummy WebhookComment object, while testing Delete will send a dummy request body with just an ID.
ペイロードの検証
Webhook 統合をテストする際、受信リクエストに次のヘッダーが含まれていることを確認してください:
token- あなたの API シークレットX-FastComments-Timestamp- Unix タイムスタンプ(秒)X-FastComments-Signature- HMAC-SHA256 署名
HMAC 署名の検証を使用して、ペイロードが正当であることを確認してください。
テストツール
開発中に受信する webhook ペイロードを検査するために、webhook.site や ngrok などのツールを使用できます。
Event Types
- Create Event: Triggered when a new comment is created. Default method: PUT
- Update Event: Triggered when a comment is edited. Default method: PUT
- Delete Event: Triggered when a comment is deleted. Default method: DELETE
各イベントはリクエストボディに完全なコメントデータを含みます(ペイロード形式については データ構造 を参照してください)。
データ構造
Webhookを介して送信される構造は、下記にTypeScriptで示した WebhookComment オブジェクトのみです。
WebhookComment オブジェクトの構造
"create" イベントの構造
"create" イベントのリクエストボディは WebhookComment オブジェクトです。
"update" イベントの構造
"update" イベントのリクエストボディは WebhookComment オブジェクトです。
"delete" イベントの構造
"delete" イベントのリクエストボディは WebhookComment オブジェクトです。
2023年11月14日の変更
以前は "delete" イベントのリクエストボディはコメントIDのみを含んでいました。新しくなり、削除時の完全なコメントを含むようになりました。 Run
Run ユーザーがコメント内でタグ付けされると、その情報は mentions というリストに保存されます。そのリスト内の各オブジェクトは次の構造を持ちます。
Run HTTP メソッド
管理パネルで各WebhookイベントタイプのHTTPメソッドを設定できます:
- Create Event: POST or PUT (default: PUT)
- Update Event: POST or PUT (default: PUT)
- Delete Event: DELETE, POST, or PUT (default: DELETE)
すべてのリクエストがIDを含むため、CreateおよびUpdate操作はデフォルトで冪等(PUT)です。同じCreateまたはUpdateリクエストを繰り返しても、あなたの側で重複したオブジェクトが作成されるべきではありません。
リクエストヘッダー
各Webhookリクエストには以下のヘッダーが含まれます:
| Header | Description |
|---|---|
Content-Type | application/json |
token | あなたのAPIシークレット |
X-FastComments-Timestamp | リクエストが署名された時刻のUnixタイムスタンプ(秒) |
X-FastComments-Signature | HMAC-SHA256署名 (sha256=<hex>) |
HMAC署名の検証に関する情報は セキュリティとAPIトークン を参照してください。
セキュリティとAPIトークン
FastComments webhook requests include multiple authentication mechanisms for security.
Headers Sent
| Header | Description |
|---|---|
token | Your API Secret (for backwards compatibility) |
X-FastComments-Timestamp | Unix timestamp (seconds) when the request was signed |
X-FastComments-Signature | HMAC-SHA256 signature of the payload |
HMAC Signature Verification (Recommended)
We strongly recommend verifying the HMAC signature to ensure webhook payloads are authentic and haven't been tampered with.
Signature Format: sha256=<hex-encoded-signature>
How the signature is computed:
- Concatenate:
timestamp + "." + JSON_payload_body - Compute HMAC-SHA256 using your API Secret as the key
- Hex-encode the result
Example Verification (Node.js)
const crypto = require('crypto');

function verifyWebhookSignature(req, apiSecret) {
    const timestamp = req.headers['x-fastcomments-timestamp'];
    const signature = req.headers['x-fastcomments-signature'];

    if (!timestamp || !signature) {
        return false;
    }

    // タイムスタンプが最近のものであることを検証する(5分以内)
    const now = Math.floor(Date.now() / 1000);
    if (Math.abs(now - parseInt(timestamp, 10)) > 300) {
        return false;  // リプレイ攻撃の防止
    }

    // 署名を検証する
    const payload = JSON.stringify(req.body);
    const expectedSignature = crypto
        .createHmac('sha256', apiSecret)
        .update(`${timestamp}.${payload}`)
        .digest('hex');

    return signature === `sha256=${expectedSignature}`;
}
Example Verification (Python)
import hmac
import hashlib
import time
import json

def verify_webhook_signature(headers, body, api_secret):
    timestamp = headers.get('X-FastComments-Timestamp')
    signature = headers.get('X-FastComments-Signature')

    if not timestamp or not signature:
        return False

    # タイムスタンプが最近のものであることを検証する
    now = int(time.time())
    if abs(now - int(timestamp)) > 300:
        return False

    # 署名を検証する
    payload = json.dumps(body, separators=(',', ':'))
    message = f"{timestamp}.{payload}"
    expected = hmac.new(
        api_secret.encode(),
        message.encode(),
        hashlib.sha256
    ).hexdigest()

    return signature == f"sha256={expected}"
Example Verification (PHP)
function verifyWebhookSignature($headers, $body, $apiSecret) {
    $timestamp = $headers['X-FastComments-Timestamp'] ?? null;
    $signature = $headers['X-FastComments-Signature'] ?? null;

    if (!$timestamp || !$signature) {
        return false;
    }

    // タイムスタンプが最近のものであることを検証する(5分以内)
    $now = time();
    if (abs($now - intval($timestamp)) > 300) {
        return false;
    }

    // 署名を検証する
    $payload = json_encode($body, JSON_UNESCAPED_SLASHES);
    $message = $timestamp . '.' . $payload;
    $expectedSignature = 'sha256=' . hash_hmac('sha256', $message, $apiSecret);

    return hash_equals($expectedSignature, $signature);
}
Legacy Authentication
The token header containing your API Secret is still sent for backwards compatibility. However, we recommend migrating to HMAC verification for improved security as it protects against replay attacks.
仕組みと再試行の処理
システム内の Comment オブジェクトへのすべての変更は、イベントを発生させ、そのイベントはキューに送られます。
最初の webhook イベントは通常、イベント発生から6秒以内に送信されます。
API がダウンした場合に備えて、このキューは Webhooks 管理画面で監視できます。
あなたの API へのリクエストが失敗した場合、当社はそれをスケジュールに基づいて再キューします。
そのスケジュールは 1 Minute * the retry count です。コールが1回失敗した場合は1分後に再試行します。2回失敗した場合は2分待ち、以降同様に増えていきます。これは、負荷に関連する理由で API がダウンしている場合に、あなたの API に過剰な負荷をかけないためです。
Webhooks はログページからキャンセルできます。
結論
これで Webhooks ドキュメントは終了です。
FastComments の Webhook 統合がわかりやすく、迅速に設定できることを願っています。
ドキュメントに不備があると感じた場合は、下記からお知らせください。