
Webhook
使用 FastComments,可以在評論被新增、更新或從我們的系統中移除時呼叫一個 API 端點。
我們透過 HTTP/HTTPS 的非同步 webhooks 來達成這個目的。
什麼是 Webhook 
Webhook 是一種機制,或是兩個系統之間的整合,其中的 "producer" (FastComments) 觸發一個事件 而 "consumer" (您) 則透過 API 呼叫來接收並處理該事件。
支援的事件與資源
FastComments 僅支援對 Comment 資源的 webhook。
我們支援對評論的建立、刪除以及更新的 webhook。
這些在我們系統中被視為獨立的事件,因而具有不同的語意 並且有不同的 webhook 事件結構。
任意數量的端點都可以從儀表板或透過 API 訂閱相同的事件 (請參閱 透過 API 管理 Webhooks)。每個 webhook 都會獨立傳送。
本機開發設定
For Local development, use a tool like ngrok.
In order to simplify keeping the system secure, local development follows the same process as setting up and securing other environments.
步驟 1:在您的帳戶中新增「localhost」至網域。
Add "localhost" as a domain here.


步驟 2:選擇 API 金鑰
We're going to be adding webhook configuration for your domain, so we'll need an API key. You can do that here.

Under "Associate with domain" - select your "localhost" domain.
注意:或者,您可以為所有測試活動和預備環境使用同一個 API 密鑰。只需為「所有網域」新增一個 API 密鑰,並給它一個像「test」的名稱。
Ensure you have an API Secret defined for your production domain(s). Events for all other domains will use the wildcard (testing) secret.
步驟 3:新增您的 Webhook
While running ngrok or similar tool, set the value for "localhost" here.
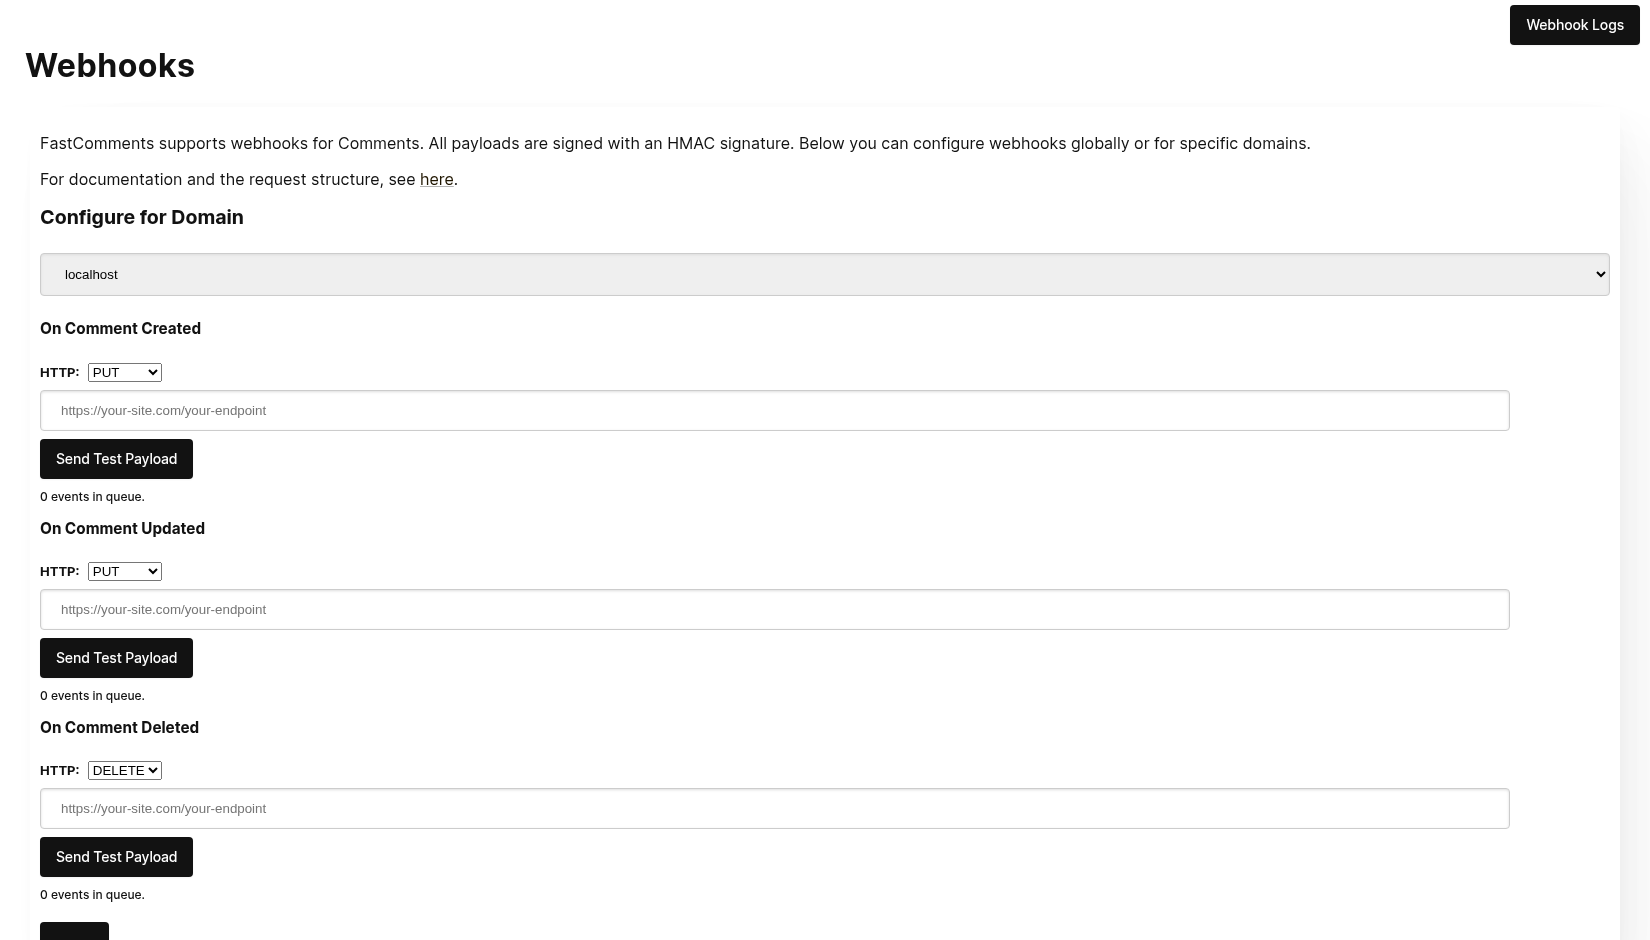
When clicking Send Test Payload, we will send two test events to check that you validate the API key.
Once it validates, hit Save.
步驟 4:新增評論
Now you can add, edit, or delete comments and should see us call your local development machine with the events, using your testing API key. There may be up to 30 seconds delay for the events to reach your machine.
設定
跟隨在 localhost 上的步驟與在正式環境相同。確保已設定正式環境的網域與 API 密鑰。
首先,前往 Webhooks 管理。此頁面可於 管理資料 -> Webhooks 取得。
此頁面會列出您帳號中的所有 webhook:
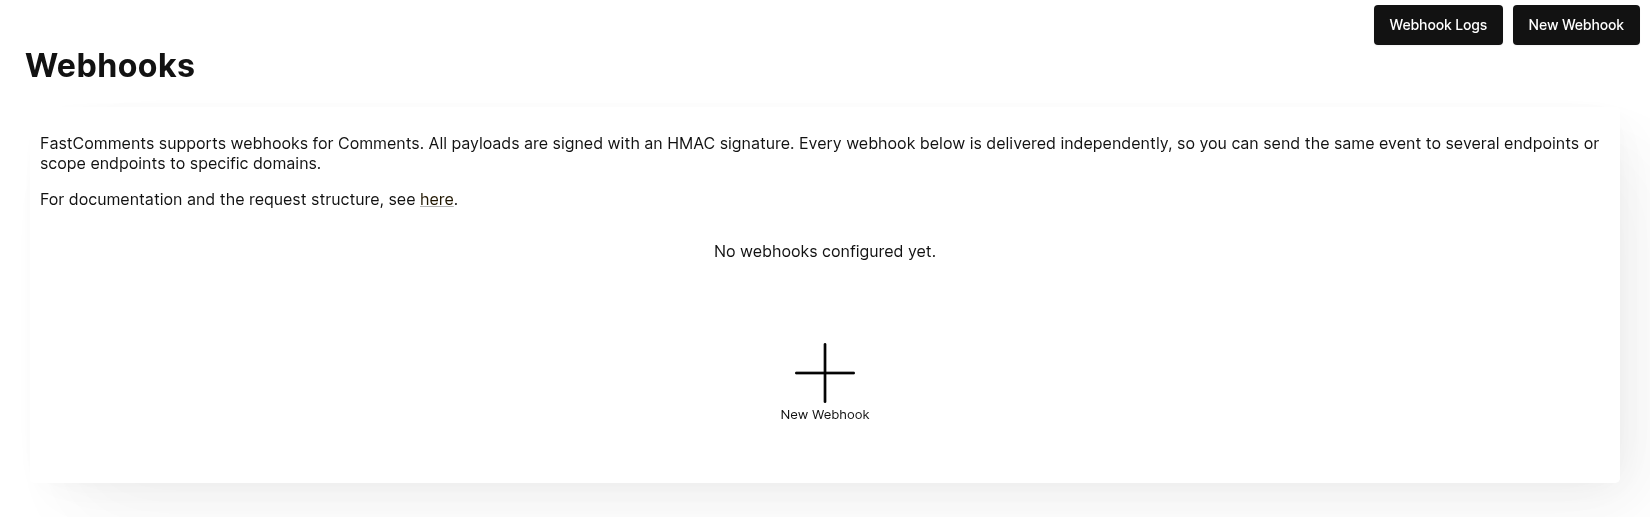
點擊 新增 Webhook 以新增。每個 webhook 包含一個 URL、一個評論事件(建立、更新或刪除)、一個域名,以及一個 HTTP 方法:
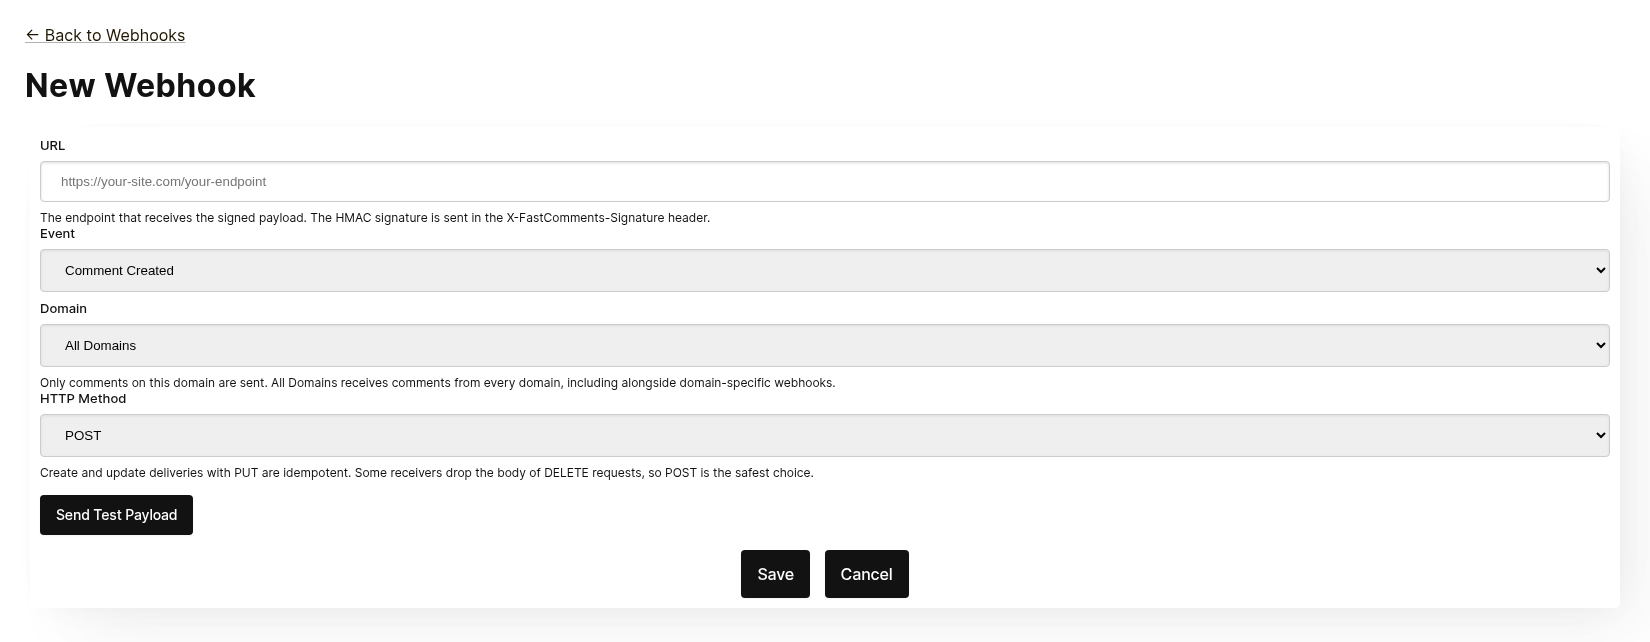
每個 webhook 皆獨立傳送。您可以將相同的事件發送至多個端點,且範圍設定為 All Domains 的 webhook 會接收所有域名的評論,即使同一事件在特定域名已存在 webhook。相同的 URL、事件與域名不可重複新增。
在儲存之前,點擊 Send Test Payload 以檢查端點是否接受已簽名的請求。請參閱下一節「測試」以取得詳細資訊。
在列表中,您可以編輯、停用、重新啟用或刪除 webhook。停用會保留排隊的事件,直到 webhook 重新啟用;刪除則會丟棄這些事件。
Webhook 也可以透過 API 建立,例如使用 Zapier。這些會在同一列表中顯示,來源標示為 API。請參閱「透過 API 管理 Webhook」以了解更多。
測試
新的和編輯 webhook 頁面都有一個 Send Test Payload 按鈕,會將請求發送到表單中目前的 URL,無論是否已儲存。Create 和 Update 事件會傳送一個虛擬的 WebhookComment 物件,而測試 Delete 時會傳送僅包含 ID 的虛擬請求主體。
驗證有效負載
測試 webhook 整合時,請確認傳入的請求包含以下標頭:
X-FastComments-Timestamp- Unix 時間戳記(秒)X-FastComments-Signature- HMAC-SHA256 簽名
在引入簽名機制之前建立的 webhook 也會收到包含您 API 密鑰的 token 標頭。新 webhook 則不會。
使用 HMAC 簽名驗證以確保 payload 為真實的。
測試工具
您可以使用像是 webhook.site 或 ngrok 之類的工具,在開發過程中檢查傳入的 webhook payload。
事件類型
- Create Event:當新評論被建立時觸發。
- Update Event:當評論被編輯時觸發。
- Delete Event:當評論被刪除時觸發。
每個 webhook 皆綁定單一事件與單一 HTTP 方法(POST、PUT 或 DELETE)。每個事件在請求主體中包含完整的評論資料(請參閱 Data Structures 了解 payload 格式)。
資料結構
The only structure sent via webhooks is the WebhookComment object, outlined in TypeScript below.
WebhookComment 物件結構
「Create」事件結構
The "create" event request body is a WebhookComment object.
「Update」事件結構
The "update" event request body is a WebhookComment object.
「Delete」事件結構
The "delete" event request body is a WebhookComment object.
變更於 Nov 14th 2023
先前的 "delete" 事件請求主體僅包含評論 id。現在會在刪除時包含完整的評論內容。
Every key is always present in the body. When the comment has no value for a field the body carries null
(or false for booleans and [] for lists), so the shape of a delivery never varies from one comment to the next.
 Run
Run When users are tagged in a comment, the information is stored in a list called mentions. Each object in that list
has the following structure.
Run HTTP 方法
You can configure the HTTP method for each webhook event type in the admin panel:
- Create Event: POST or PUT (default: PUT)
- Update Event: POST or PUT (default: PUT)
- Delete Event: DELETE, POST, or PUT (default: DELETE)
Since all requests contain an ID, Create and Update operations are idempotent by default (PUT). Repeating the same Create or Update request should not create duplicate objects on your side.
請求標頭
Each webhook request includes the following headers:
| 標頭 | 說明 |
|---|---|
Content-Type | application/json |
token | 您的 API 密鑰 |
X-FastComments-Timestamp | 請求簽署時的 Unix 時間戳(秒) |
X-FastComments-Signature | HMAC-SHA256 簽名(sha256=<hex>) |
See Security & API Tokens for information on verifying the HMAC signature.
安全性與 API 令牌
FastComments 的 webhook 請求包含多種驗證機制以確保安全性。
Headers Sent
| Header | Description |
|---|---|
token | 您的 API Secret(為了向後相容) |
X-FastComments-Timestamp | Unix 時間戳(秒),表示請求簽名的時間 |
X-FastComments-Signature | 載荷的 HMAC-SHA256 簽名 |
HMAC Signature Verification (Recommended)
我們強烈建議驗證 HMAC 簽名,以確保 webhook 載荷為真實且未被竄改。
Signature Format: sha256=<hex-encoded-signature>
How the signature is computed:
- 串接:
timestamp + "." + JSON_payload_body - 使用您的 API Secret 作為金鑰計算 HMAC-SHA256
- 將結果進行十六進位編碼
Example Verification (Node.js)
const crypto = require('crypto');

function verifyWebhookSignature(req, apiSecret) {
    const timestamp = req.headers['x-fastcomments-timestamp'];
    const signature = req.headers['x-fastcomments-signature'];

    if (!timestamp || !signature) {
        return false;
    }

    // 驗證時間戳記是否為近期(5 分鐘內)
    const now = Math.floor(Date.now() / 1000);
    if (Math.abs(now - parseInt(timestamp, 10)) > 300) {
        return false;  // 防止重放攻擊
    }

    // 驗證簽名
    const payload = JSON.stringify(req.body);
    const expectedSignature = crypto
        .createHmac('sha256', apiSecret)
        .update(`${timestamp}.${payload}`)
        .digest('hex');

    return signature === `sha256=${expectedSignature}`;
}
Example Verification (Python)
import hmac
import hashlib
import time
import json

def verify_webhook_signature(headers, body, api_secret):
    timestamp = headers.get('X-FastComments-Timestamp')
    signature = headers.get('X-FastComments-Signature')

    if not timestamp or not signature:
        return False

    # 驗證時間戳記是否為近期
    now = int(time.time())
    if abs(now - int(timestamp)) > 300:
        return False

    # 驗證簽名
    payload = json.dumps(body, separators=(',', ':'))
    message = f"{timestamp}.{payload}"
    expected = hmac.new(
        api_secret.encode(),
        message.encode(),
        hashlib.sha256
    ).hexdigest()

    return signature == f"sha256={expected}"
Example Verification (PHP)
function verifyWebhookSignature($headers, $body, $apiSecret) {
    $timestamp = $headers['X-FastComments-Timestamp'] ?? null;
    $signature = $headers['X-FastComments-Signature'] ?? null;

    if (!$timestamp || !$signature) {
        return false;
    }

    // 驗證時間戳記是否為近期(5 分鐘內)
    $now = time();
    if (abs($now - intval($timestamp)) > 300) {
        return false;
    }

    // 驗證簽名
    $payload = json_encode($body, JSON_UNESCAPED_SLASHES);
    $message = $timestamp . '.' . $payload;
    $expectedSignature = 'sha256=' . hash_hmac('sha256', $message, $apiSecret);

    return hash_equals($expectedSignature, $signature);
}
Legacy Authentication
包含您 API Secret 的 token 標頭仍然會為了向後相容而發送。然而,我們建議遷移到 HMAC 驗證以提升安全性,因為它可以防止重放攻擊。
透過 API 管理 Webhook
Webhooks 也可以透過 REST API 進行管理。這就是像 Zapier 這樣的整合在不觸碰儀表板的情況下訂閱評論事件的方式,且它遵循 REST Hooks 模式:訂閱、接收事件、取消訂閱。
API 訂閱與儀表板中設定的 Webhooks 同時存在。評論事件會傳送給每一個符合其 domain 的 webhook,各自作為獨立的傳遞,無論 webhook 是以何種方式建立。
Authentication
每個請求都需要在 x-api-key 標頭(或 API_KEY 查詢參數)中提供您的 API 金鑰,並在 tenantId 查詢參數中提供您的租戶 ID。兩者皆可在儀表板的 API Secret 頁面上看到。
Subscribe
POST https://fastcomments.com/api/v1/webhooks?tenantId=YOUR_TENANT_ID
x-api-key: YOUR_API_KEY
Content-Type: application/json

{
    "url": "https://hooks.zapier.com/hooks/catch/123/abc",
    "event": "comment-created"
}| 欄位 | 必填 | 說明 |
|---|---|---|
url | 是 | 絕對的 http 或 https URL。 |
event | 是 | comment-created、comment-updated 或 comment-deleted。 |
domain | 否 | 您帳號設定中的一個 domain。預設為 *,會接收所有 domain 的事件。 |
method | 否 | POST(預設)、PUT 或 DELETE。 |
回應中會包含此訂閱資訊:
{
    "status": "success",
    "webhook": {
        "id": "66f1c4c1e7a2b3d4f5a6b7c8",
        "url": "https://hooks.zapier.com/hooks/catch/123/abc",
        "event": "comment-created",
        "domain": "*",
        "method": "POST",
        "source": "api",
        "enabled": true,
        "createdAt": "2026-09-08T12:00:00.000Z"
    }
}
將相同的 URL、相同的事件與 domain 再次訂閱時,會回傳已存在的訂閱,而不是建立重複項目,讓客戶端可以安全地重試。每個租戶最多可有 50 個 API 訂閱。
List
GET https://fastcomments.com/api/v1/webhooks?tenantId=YOUR_TENANT_ID返回該租戶的所有 webhook,包括儀表板中管理的("source": "dashboard")。可使用 event、domain 或 source 進行過濾。
Unsubscribe
DELETE https://fastcomments.com/api/v1/webhooks/SUBSCRIPTION_ID?tenantId=YOUR_TENANT_ID刪除訂閱同時會丟棄仍在佇列中的任何事件。只有透過 API 建立的訂閱才能以此方式刪除;儀表板的 webhook,或是帳號中不存在的 ID,會回傳 404 並帶有 not-found 錯誤碼。儀表板的 webhook 可在 Webhooks 頁面上編輯。
Payloads and signing
傳遞使用與儀表板 webhook 相同的 payload(請參閱 Data Structures),並以相同的 HMAC 方式簽名(請參閱 Security & API Tokens)。API 訂閱永不會收到舊版的 token 標頭,請改為驗證 X-FastComments-Signature 標頭。
Sample payloads
GET https://fastcomments.com/api/v1/webhooks/sample-payloads?tenantId=YOUR_TENANT_ID&event=comment-created&limit=3返回帳號最近的評論,完全符合傳遞的資料結構,讓整合在第一個事件到達前就能顯示真實的範例資料。event 為可選項且僅作驗證,因為每個事件都會傳遞相同的評論物件。limit 預設為 3,接受 1 到 10 的值。耗費 2 個 API 點數。
{
    "status": "success",
    "payloads": [
        {
            "id": "66f1c4c1e7a2b3d4f5a6b7c8",
            "urlId": "https://example.com/blog/hello-world",
            "commenterName": "Jane Reader",
            "comment": "Great article!",
            "date": "2026-09-08T12:00:00.000Z",
            "approved": true
        }
    ]
}
Responding with 410 Gone
如果 API 訂閱的端點回應 HTTP 410 Gone,FastComments 會將其視為取消訂閱:訂閱會被刪除,佇列中的事件也會一起清除,且不會再嘗試傳遞。儀表板中設定的 webhook 永不會自動刪除;對它們而言 410 只是普通的失敗。其他任何失敗狀態都會重試,最終會停用該 webhook,詳情請參閱 How it Works & Handling Retries。
Dashboard
API 訂閱會在 Webhooks 列表中顯示來源 API,管理員可以編輯、停用、重新啟用或刪除它們。
運作方式與重試處理
系統中對 Comment 物件的所有變更都會觸發一個事件,該事件最終會進入佇列。
初始的 webhook 事件通常會在事件來源發生後約六秒內發送。
你可以在 Webhooks 管理介面中監控此佇列,以防你的 API 故障。
如果對你的 API 的請求失敗,我們會依排程將其重新放入佇列。
該排程為 1 Minute * the retry count。如果呼叫失敗一次,系統將在
一分鐘後重試。如果失敗兩次,則會等待兩分鐘,依此類推。這樣做是為了
避免在你因為負載相關原因而出現故障時,對你的 API 造成過大的負載。
Webhooks 可以從 記錄頁面 取消。
結論
以上即為我們的 Webhooks 文件。
我們希望您覺得 FastComments 的 Webhook 整合容易理解且快速設定。
如果您發現我們的文件有任何遺漏,請在下方讓我們知道。