
Aggiungi commenti al tuo LMS tramite LTI 1.3
FastComments si integra con qualsiasi LMS conforme a LTI 1.3 - D2L Brightspace, Moodle, Blackboard Learn, Sakai, Schoology e altri - tramite lo standard IMS LTI Dynamic Registration. Un unico URL, incollato nella schermata di registrazione del tuo LMS, mette in funzione l'intera integrazione: SSO, contesto del corso, mappatura dei ruoli e posizionamento dei contenuti. Nessun plugin da installare sul tuo server. (Canvas LMS ha la sua guida dedicata perché il suo flusso di registrazione è diverso.)
Una volta registrato, FastComments appare come Learning Tool all'interno dei tuoi corsi. Gli studenti vedono commenti in thread e una chat collaborativa accanto ai contenuti del corso, e accedono automaticamente con il loro account LMS.
Prezzi 
L'integrazione FastComments LTI 1.3 è inclusa nei piani Flex e Pro senza costi aggiuntivi. Funziona con qualsiasi LMS che supporti la specifica IMS LTI 1.3 Advantage, inclusa la Registrazione Dinamica.
Avvio rapido
- Accedi a FastComments e vai alla tua pagina di configurazione LTI 1.3.
- (Facoltativo) Seleziona la piattaforma da cui ti connetti dal menu a discesa Platform - imposta l'etichetta di visualizzazione, ma Auto-detect funziona bene.
- Clicca su Generate URL. Apparirà un Registration URL usa e getta (valido per 30 minuti).
- Nel tuo LMS, apri la schermata di Registrazione Dinamica LTI 1.3 e incolla l'URL nel campo Tool initiation registration endpoint (o equivalente). Invia.
- Il tuo LMS richiama FastComments, scambia le chiavi e crea l'integrazione. Il popup si chiude automaticamente al termine.
- Tornando in FastComments, la nuova configurazione appare nella tabella Existing Configurations. Lo strumento è ora disponibile nei corsi del tuo LMS.
Piattaforme supportate
FastComments LTI 1.3 è stato testato con:
- D2L Brightspace (qualsiasi versione con LTI Advantage)
- Moodle 4.0+ (plugin External Tool, LTI Advantage)
- Blackboard Learn (SaaS e Ultra)
- Sakai (versioni con supporto LTI Advantage)
- Schoology (Enterprise, Dynamic Registration dove disponibile)
Qualsiasi altro LMS che implementa la specifica IMS LTI 1.3 Advantage con Dynamic Registration dovrebbe funzionare - seleziona Altra piattaforma LTI 1.3 dal menu a discesa della piattaforma quando generi la tua URL di registrazione (ottienilo qui).
Canvas LMS utilizza un flusso di configurazione diverso (per-developer-key configuration JSON invece di Dynamic Registration). Consulta la guida di installazione dedicata a Canvas LMS.
Genera URL di registrazione
Vai alla configurazione LTI 1.3
Accedi a FastComments e vai a la tua pagina di configurazione LTI 1.3.
Se il tuo account non ha ancora accesso a LTI, vedrai "LTI non abilitato per questo account" - contatta il supporto per abilitarlo sul tuo piano.
Scegli una piattaforma (opzionale)
Sotto Genera un URL di registrazione dinamico, usa il menu a discesa Piattaforma per indicare a FastComments a quale LMS ti stai collegando:
- D2L Brightspace
- Moodle
- Blackboard Learn
- Sakai
- Schoology
- Altra piattaforma LTI 1.3
Puoi anche lasciarlo su Rilevamento automatico. La piattaforma viene letta dall'openid-configuration del tuo LMS durante la registrazione; il menu a discesa imposta solo l'etichetta di visualizzazione per la configurazione risultante.
Genera l'URL
Fai clic su Genera URL. FastComments crea un token di registrazione monouso e ti mostra un URL che appare come:
https://fastcomments.com/lti/v1p3/register/<long-token>
Copialo. Questo URL:
- È monouso - una volta che il tuo LMS lo richiama con successo, il token viene consumato.
- Scade dopo 30 minuti se non viene usato.
- Deve essere mantenuto privato - chiunque abbia l'URL può registrare uno strumento per il tuo tenant entro quei 30 minuti.
Configurazioni esistenti
Una volta che una registrazione è completata con successo, la nuova configurazione viene visualizzata nella tabella Configurazioni esistenti sulla stessa pagina, con Piattaforma, Emittente, Client ID e Stato. Puoi eliminare le configurazioni da questa tabella se mai dovessi annullare la registrazione.
Registrazione in D2L Brightspace
D2L Brightspace espone la Registrazione Dinamica tramite l'interfaccia di amministrazione LTI Advantage. Avrai bisogno di accesso amministrativo.
Open the Registration Screen
- Accedi alla tua istanza Brightspace come amministratore.
- Vai a Admin Tools > Manage Extensibility > LTI Advantage.
- Fai clic su Register Tool. (L'URL diretto è
https://<your-brightspace-host>/d2l/le/ltiadvantage/registrations/create.)
Paste the URL
Vedrai un modulo di registrazione. Il campo chiave è Tool initiation registration endpoint (alcune versioni di Brightspace lo etichettano come "Tool Initiation Registration URL").
Incolla l'URL di registrazione di FastComments (ottienilo qui) in quel campo. Lascia gli altri campi vuoti - vengono compilati automaticamente da FastComments durante lo scambio di registrazione.
Fai clic su Register.
Approve the Tool
Brightspace apre una finestra pop-up che comunica con FastComments, scambia le chiavi e mostra una schermata di conferma. La finestra pop-up si chiude automaticamente quando la registrazione è completata.
Il nuovo strumento appare nell'elenco degli strumenti LTI Advantage. Per impostazione predefinita Brightspace contrassegna i nuovi strumenti come disabled - attiva l'interruttore su enabled affinché i tuoi corsi possano utilizzarlo.
Add a Deployment
In Brightspace, gli strumenti LTI necessitano di un deployment prima di poter essere utilizzati nei corsi:
- Apri lo strumento FastComments appena registrato.
- Fai clic su View Deployments > New Deployment.
- Dai al deployment un nome (es. "FastComments - All Courses"), seleziona le unità organizzative in cui deve essere disponibile e salva.
Dopo il primo avvio tramite questo deployment, FastComments associa il deployment_id al suo record di configurazione - i successivi avvii da un deployment diverso sotto lo stesso client saranno rifiutati a meno che non ti registri nuovamente.
Registrazione in Moodle
Usi Moodle? Pubbliciamo anche un plugin dedicato per Moodle per FastComments con un'integrazione più stretta rispetto a LTI 1.3 (hook di sincronizzazione dei voti, report attività più approfonditi, interfaccia delle impostazioni nativa di Moodle). Vedi la guida all'installazione del plugin Moodle. Il flusso LTI 1.3 qui sotto è la scelta giusta se vuoi una registrazione unica che copra anche altri LMS, o se l'amministratore di Moodle non installerà plugin di terze parti.
Moodle 4.0+ supporta la Registrazione Dinamica LTI 1.3 tramite il plugin External Tool.
Apri la schermata di gestione dello strumento
- Accedi a Moodle come amministratore del sito.
- Naviga su Site administration > Plugins > Activity modules > External tool > Manage tools.
Incolla l'URL
Vedrai una scheda etichettata URL dello strumento. Incolla l'URL di registrazione di FastComments (ottienilo qui) nel campo di testo e clicca Aggiungi LTI Advantage.
Moodle aprirà una schermata di registrazione che mostra l'identità dello strumento e le autorizzazioni richieste. Verifica e clicca Attiva (o Registra, a seconda della versione di Moodle).
La finestra popup si chiude al termine della registrazione; il nuovo strumento FastComments appare nella lista Strumenti con lo stato Attivo.
Rendilo disponibile
Per impostazione predefinita Moodle aggiunge i nuovi strumenti alla lista "strumenti del corso" ma non li mostra nel selettore di attività. Per rendere FastComments disponibile in tutto il corso:
- Clicca l'icona dell'ingranaggio sulla scheda FastComments.
- Sotto Tool configuration usage, scegli Mostra nel selettore attività e come strumento preconfigurato.
- Salva.
Gli insegnanti ora possono aggiungere FastComments a qualsiasi corso tramite Aggiungi un'attività o una risorsa > FastComments.
Registrazione in Blackboard Learn
Blackboard Learn SaaS e Ultra supportano la registrazione dinamica LTI 1.3.
Apri la schermata del provider dello strumento
- Accedi a Blackboard come amministratore di sistema.
- Vai a Pannello di amministrazione > Integrazioni > Fornitori di strumenti LTI.
- Fai clic su Registra strumento LTI 1.3 / LTI Advantage.
Se vedi solo "Register LTI 1.1 Provider", la tua versione di Blackboard non supporta ancora LTI 1.3 - esegui l'aggiornamento o contatta il supporto Blackboard.
Incolla l'URL
Incolla l'URL di registrazione di FastComments (lo trovi qui) nel campo Client ID / Registration URL (la denominazione in Blackboard varia a seconda della versione). Invia.
Blackboard esegue la procedura di registrazione con FastComments e mostra una schermata di conferma.
Approva e abilita
Blackboard contrassegna gli strumenti appena registrati come Approvato ma escluso per impostazione predefinita:
- Trova la voce FastComments nell'elenco dei fornitori di strumenti.
- Apri il menu e scegli Modifica.
- Imposta Stato dello strumento su Approvato.
- Sotto Politiche dell'istituzione, verifica quali dati utente vengono inviati (nome, email, ruolo). Salva.
Lo strumento è ora disponibile per i docenti quando aggiungono contenuti ai corsi.
Registrazione in Sakai o Schoology
Sakai
Sakai supporta la Registrazione Dinamica LTI 1.3 nelle release con LTI Advantage. Dalla Area di amministrazione:
- Accedi come amministratore Sakai e apri la Administration Workspace.
- Scegli External Tools > Install LTI 1.3 Tool.
- Incolla l'URL di registrazione FastComments (ottienilo qui) e invia.
- Approva lo strumento quando l'handshake è completato.
Lo strumento apparirà quindi sotto External Tools e può essere aggiunto ai siti dai loro manutentori.
Schoology
Le istanze Schoology Enterprise supportano LTI 1.3 ma la disponibilità della Registrazione Dinamica varia in base alla distribuzione. Verifica con il tuo account manager Schoology.
Se la Registrazione Dinamica non è disponibile sulla tua istanza Schoology, dovrai configurare l'integrazione manualmente utilizzando questi endpoint:
- URL di accesso OIDC:
https://fastcomments.com/lti/v1p3/login - URL del collegamento di destinazione:
https://fastcomments.com/lti/v1p3/launch - URL del set di chiavi pubbliche (JWKS):
https://fastcomments.com/lti/v1p3/jwks - URL di reindirizzamento:
https://fastcomments.com/lti/v1p3/launch
Dopo che Schoology ti fornisce un Client ID e un Deployment ID, contatta il supporto FastComments per registrare la configurazione sul tuo tenant.
Altre piattaforme LTI 1.3
Qualsiasi LMS che segua la specifica IMS LTI 1.3 Advantage dovrebbe funzionare con lo stesso URL di registrazione (ottienilo qui). Cerca un'impostazione etichettata "Registrazione Dinamica", "URL di registrazione dello strumento", "endpoint di registrazione per l'inizializzazione dello strumento" o simile.
Se la tua piattaforma supporta solo la configurazione manuale di LTI 1.3, usa i quattro endpoint elencati nella sezione Schoology sopra e contatta il supporto per finalizzare.
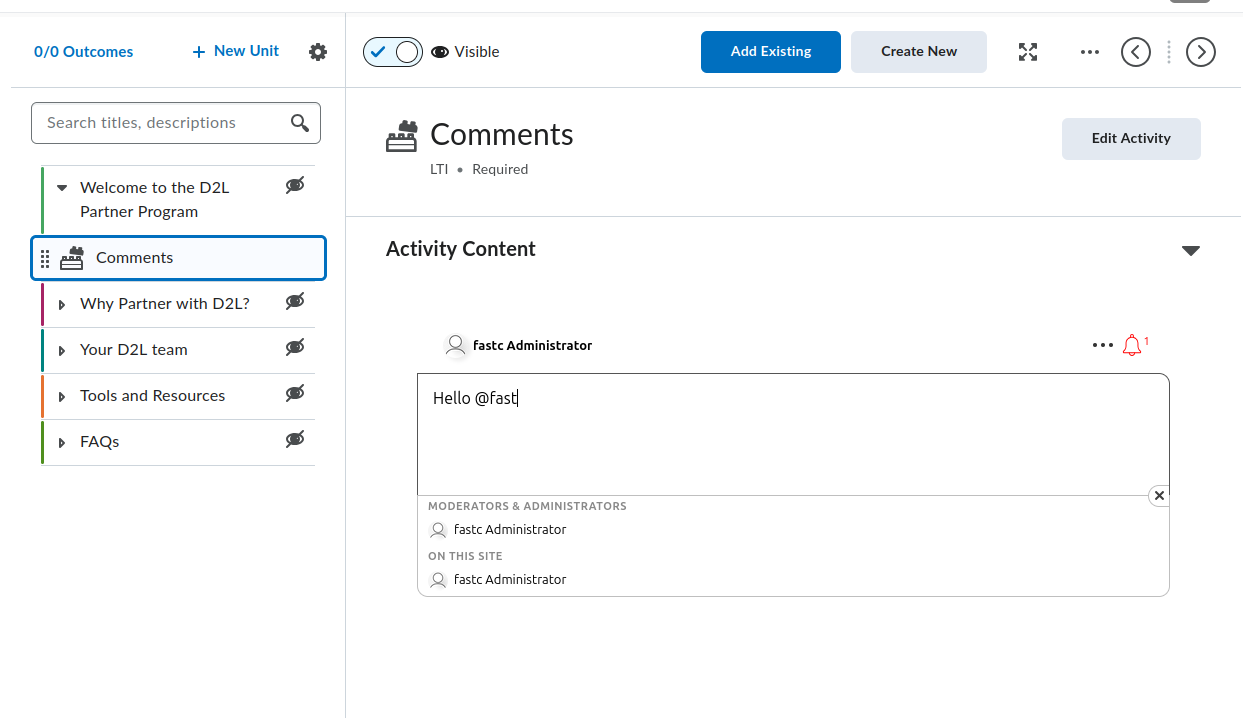
Aggiungi ai contenuti del corso in D2L
Questa pagina tratta l'aggiunta di FastComments a un corso Brightspace dopo che un amministratore ha registrato lo strumento e creato una deployment. Se lo strumento non è ancora registrato, consultare prima la guida alla registrazione D2L.
Brightspace fornisce due esperienze di creazione dei contenuti: Classic Content e la New Content Experience (detta anche Lessons). Entrambe espongono FastComments, ma i percorsi dei menu differiscono. Ogni sezione qui sotto copre entrambe le opzioni quando divergono.
Locate the FastComments Tool
Lo strumento FastComments appare in due punti all'interno dell'editor dei contenuti del corso:
- Il selettore di attività, raggiungibile dal pulsante Add Existing del modulo/unità (etichettato Add Existing Activities nelle versioni più vecchie di Brightspace). FastComments appare direttamente nel selettore nelle build correnti di Brightspace; nelle versioni più vecchie è annidato sotto un sottomenu External Learning Tools. Entrambe le vie aggiungono FastComments come argomento indipendente.
- La finestra di dialogo Insert Stuff all'interno dell'editor HTML, sotto LTI Advantage. Questo incorpora FastComments inline in un argomento HTML tramite il flusso di deep linking LTI.
Se FastComments non appare in nessuno dei due selettori, la deployment non è abilitata per l'unità organizzativa che contiene il corso. Chiedere all'amministratore Brightspace di aprire Admin Tools > Manage Extensibility > LTI Advantage > FastComments tool > View Deployments, aprire la deployment e aggiungere l'unità organizzativa del corso (o una unità superiore) sotto Org Units.
Add FastComments as a Topic in a Module
Classic Content:
- Aprire il corso e cliccare Content nella barra di navigazione.
- Selezionare il modulo che dovrebbe contenere la discussione (o crearne uno tramite Add a module).
- Cliccare Add Existing (Brightspace più vecchio: Add Existing Activities > External Learning Tools).
- Nel selettore, cliccare FastComments. Brightspace crea un argomento nel modulo e ritorna alla vista contenuti.
- Cliccare il nuovo argomento. Rinominarlo con qualcosa di descrittivo come
FastComments Discussionusando l'editor del titolo inline.
New Content Experience (Lessons):
- Aprire il corso e cliccare Content.
- Aprire l'unità e la lesson che dovrebbero contenere la discussione.
- Cliccare Add > Existing Activity e selezionare FastComments (Brightspace più vecchio: annidato sotto External Learning Tools).
- L'attività viene aggiunta alla lesson.
- Cliccare il titolo dell'attività per rinominarlo.
La prima volta che qualsiasi utente (istruttore o studente) apre l'argomento, FastComments inizializza il thread per quel resource link. Il thread è vincolato all'ID del resource link, quindi rinominare o spostare l'argomento non cambia quale thread viene caricato.
Embed FastComments Inline in an HTML Topic
Usare questo flusso quando si desidera che i commenti appaiano sotto un testo, un video o altro contenuto all'interno della stessa pagina argomento invece che come argomento separato.
- Aprire o creare un argomento HTML nel modulo/lesson.
- Cliccare Edit HTML per aprire l'editor HTML di Brightspace.
- Posizionare il cursore dove deve apparire il thread di commenti.
- Cliccare il pulsante Insert Stuff (icona a forma di pezzo di puzzle nella barra dell'editor).
- Nella finestra Insert Stuff, scorrere fino a LTI Advantage e cliccare FastComments.
- FastComments apre un selettore di deep linking. Confermare il posizionamento (le opzioni predefinite funzionano per le discussioni sul contenuto); cliccare Insert o Continue.
- Brightspace ritorna all'editor HTML con un blocco segnaposto che rappresenta il lancio LTI. Cliccare Save and Close sull'argomento.
Quando l'argomento viene caricato, Brightspace sostituisce il segnaposto con un iframe che avvia automaticamente FastComments tramite LTI. Gli studenti vedono il thread di discussione inline.
Un singolo argomento HTML può contenere più embed deep-linked di FastComments. Ogni embed ottiene il proprio thread perché ogni deep link produce un diverso resource link ID.
Module Topic vs Inline Quicklink
Scegliere l'approccio module topic quando:
- La discussione è l'attività principale per quel passaggio nel modulo.
- Si desidera che l'argomento appaia nella table of contents di Brightspace, nel tracciamento del completamento e in Class Progress.
Scegliere l'approccio inline embed quando:
- I commenti devono essere posizionati sotto altro contenuto sulla stessa pagina.
- Non si desidera un elemento separato tracciabile per il completamento nella table of contents.
Visibility, Draft, and Release Conditions
Un nuovo argomento FastComments è visibile agli studenti per impostazione predefinita. Per nasconderlo mentre lo si prepara:
- Nell'editor dei contenuti, cliccare il titolo dell'argomento (Classic) o il menu a tre puntini sull'attività (New Content Experience).
- Impostare lo status su Draft (Classic) o disattivare la Visibility (New Content Experience).
Gli argomenti in Draft sono invisibili agli studenti. I docenti e gli assistenti didattici li vedono comunque con un badge "Draft".
Per limitare l'argomento a un gruppo o a una sezione specifica:
- Aprire l'argomento.
- Cliccare il menu del titolo dell'argomento > Edit Properties In-place (Classic) o Edit > Restrictions (New Content Experience).
- Sotto Release Conditions, cliccare Create.
- Scegliere Group enrollment o Section enrollment, selezionare il gruppo/sezione e salvare.
Le release conditions si sommano alla mappatura dei ruoli di FastComments. Gli studenti che non possono vedere l'argomento non ricevono un lancio LTI.
What Students See on First Launch
Quando uno studente clicca l'argomento (o carica un argomento HTML con un embed):
- Brightspace esegue il lancio LTI 1.3 in background.
- FastComments riceve il nome dello studente, l'email, l'URL dell'avatar e il ruolo LMS, e li autentica automaticamente. Non viene richiesto alcun login FastComments.
- Il thread di commenti per quel resource link viene renderizzato all'interno dell'iframe di Brightspace.
Mappatura dei ruoli al lancio:
- Brightspace
Administratordiventa un amministratore FastComments (admin) per il thread (piena moderazione, eliminazione, ban e accesso alla configurazione). - Brightspace
Instructordiventa un moderatore FastComments (moderator) (pin, nascondi, elimina, ban). - Tutti gli altri ruoli (
Learner,TeachingAssistant, ecc.) diventano commentatori standard.
I commenti sono attribuiti all'account Brightspace dello studente. Se lo studente modifica il suo nome o avatar in Brightspace, il successivo lancio LTI sincronizzerà la modifica.
Lock Down Public Access (Recommended)
Per impostazione predefinita, i dati dei commenti FastComments sono leggibili pubblicamente. Chiunque riesca a indovinare l'URL di un thread o un endpoint API può visualizzarne i commenti, anche al di fuori di Brightspace. Per le discussioni di corso quasi certamente si vorrà limitare la visualizzazione ai soli partecipanti iscritti.
Aprire la propria pagina di personalizzazione del widget e creare una regola con Require SSO To View Comments abilitato, quindi impostare il livello di sicurezza su Secure SSO in modo che i thread possano essere caricati solo tramite il lancio LTI firmato.
Consultare Protecting Comment Threads With Single-Sign-On per la procedura completa, incluso come limitare la regola a un singolo dominio o pagina.
Iframe Height and Resize
FastComments emette il postMessage org.imsglobal.lti.frameResize ad ogni render del thread e al cambiare del contenuto (nuovo commento, espansione delle risposte). Brightspace ascolta questo messaggio e regola l'altezza dell'iframe in modo che il thread non venga tagliato e non mostri una barra di scorrimento interna.
Se l'iframe rimane a un'altezza fissa e bassa:
- Confermare che il corso sia caricato tramite HTTPS. Il listener postMessage di Brightspace rifiuta frame con contenuti misti.
- Confermare che nessuna estensione del browser stia bloccando il canale postMessage.
- Per gli embed inline in un argomento HTML, l'HTML circostante non deve avvolgere l'iframe in un contenitore ad altezza fissa. Rimuovere qualsiasi
style="height: ..."inline dall'elemento padre.
Brightspace-Specific Gotchas
Tool not showing in the Add Existing picker. La deployment non è abilitata per l'unità organizzativa di questo corso. Un amministratore deve aggiungere l'unità organizzativa (o una parent) alla lista Org Units della deployment. La sola registrazione dello strumento non è sufficiente; la deployment definisce quali corsi vedono lo strumento.
deployment_id mismatch on launch. FastComments applica TOFU al primo deployment_id che incontra per una registrazione. Se un amministratore elimina la deployment originale e ne crea una nuova, i lanci dalla nuova deployment vengono rifiutati con un errore di mismatch della deployment. La soluzione è registrare nuovamente FastComments (generare una nuova URL di registrazione (ottienila qui) ed eseguire di nuovo la Dynamic Registration); il vecchio record di configurazione viene sostituito.
Tool launches but shows "Invalid LTI launch". Il corso è in una struttura tenant/org diversa da quella coperta dalla deployment, oppure la deployment è stata disabilitata dopo la registrazione. Ricontrollare Admin Tools > Manage Extensibility > LTI Advantage > FastComments > toggle Enabled e la lista delle org unit della deployment.
Names and roles missing inside FastComments. Brightspace invia i lanci LTI con claims NRPS (Names and Role Provisioning Services). Se un corso è stato aggiornato da un vecchio link LTI 1.1, il lancio può non contenere i claims name e email. Reinserire l'argomento FastComments tramite Add Existing (non migrare il vecchio link) in modo che il lancio usi LTI 1.3.
Embed shows a login screen instead of auto-SSO. L'argomento HTML è stato inserito come un semplice <iframe> puntato a FastComments invece che tramite Insert Stuff > LTI Advantage. I frame plain saltano il lancio LTI e mandano gli utenti alla pagina pubblica di FastComments. Eliminare l'iframe e reinserirlo tramite il flusso Insert Stuff.
Aggiungi ai contenuti del corso in Moodle
Questa guida spiega come aggiungere FastComments a un corso Moodle 4.x dopo che un amministratore del sito ha registrato lo strumento e lo ha impostato per essere mostrato nel selettore di attività. Se FastComments non è ancora registrato, consultare prima la guida alla registrazione di Moodle.
Aprire il corso in modalità di modifica
- Accedi a Moodle come Docente con permessi di modifica (o ruolo superiore) per il corso.
- Apri il corso.
- Attiva la Modalità modifica usando l'interruttore nell'angolo in alto a destra dell'intestazione del corso.
Moodle 4.x ha sostituito il vecchio menu a discesa "Aggiungi un'attività o una risorsa" usato nella 3.x con una finestra di selezione attività a schermo intero. Moodle 4.5 mantiene lo stesso selettore ma aggiunge una riga con elementi preferiti/stellati in alto, quindi appuntare FastComments una volta rende più veloce raggiungerlo nelle sezioni successive.
Aggiungere l'attività FastComments
- Scorri fino alla sezione del corso (argomento o settimana) a cui appartiene la discussione.
- Clicca Aggiungi un'attività o una risorsa nella parte inferiore di quella sezione.
- Nella finestra di selezione, seleziona FastComments. Se non lo vedi, passa alla sezione sulle avvertenze qui sotto.
Si apre il modulo delle impostazioni dell'attività. I campi che contano:
- Activity name (obbligatorio). Visualizzato nella pagina del corso e nel registro voti. Esempio:
Week 3 Discussion. - Activity description. Testo introduttivo facoltativo visualizzato sopra il thread di commenti.
- Show description on course page. Seleziona questa opzione se vuoi che la descrizione sia visibile senza entrare nell'attività.
- Preconfigured tool. Impostato su
FastComments(selezionato automaticamente quando lanciato dal selettore). Non modificarlo. - Launch container. Impostare su Nuova finestra. Vedi la sezione sulle avvertenze per il motivo per cui "Stessa finestra" può causare problemi in alcune installazioni Moodle.
- Tool URL, Public key, Shared secret, Custom parameters. Lasciare vuoti. La Registrazione Dinamica gestisce questi valori a livello di sito.
Scorri fino in fondo e clicca Salva e torna al corso (o Salva e visualizza per aprire subito l'attività).
L'attività appare come una riga nella sezione con l'icona FastComments. Gli studenti cliccano sulla riga per aprire il thread di commenti.
Incorporare FastComments inline nell'editor
Per un thread all'interno di una Pagina, capitolo di Book, Lezione o qualsiasi altra risorsa che utilizzi l'editor Atto o TinyMCE:
- Apri la risorsa in modalità di modifica.
- Posiziona il cursore dove deve apparire il thread.
- Nella barra degli strumenti dell'editor, clicca il pulsante LTI / Strumento esterno. In Atto è etichettato "Insert LTI Advantage content". In TinyMCE (di default in Moodle 4.3+) si trova nel menu Altro come Strumenti esterni.
- Scegli FastComments dalla lista degli strumenti.
- FastComments apre un selettore di deep-linking. Conferma il titolo del thread e clicca Incorpora.
- L'editor inserisce un blocco segnaposto LTI. Salva la risorsa.
Ogni istanza incorporata è un thread distinto indicizzato sull'ID dell'elemento di deep-linking, quindi una Pagina con tre embed di FastComments genera tre thread indipendenti.
Restrizioni di accesso e impostazioni dei gruppi
Le impostazioni standard delle attività di Moodle si applicano alle attività FastComments:
- Common module settings > Group mode. Impostare questo su Gruppi separati o Gruppi visibili non divide automaticamente FastComments in thread per gruppo. La modalità gruppi di Moodle filtra solo il registro voti e l'elenco dei membri. Per avere un thread separato per ogni gruppo, aggiungi un'attività FastComments per ogni gruppo e usa Restrict access per delimitare ciascuna.
- Restrict access > Add restriction. Supporta le condizioni standard di Moodle: Date, Grade, Group, Grouping, User profile, e insiemi di restrizioni nidificati. Usa Group per bloccare un'attività FastComments a un singolo gruppo.
- Activity completion. Imposta su Gli studenti devono visualizzare questa attività per completarla se vuoi il tracciamento del completamento. FastComments attualmente non invia un evento di completamento a Moodle oltre al lancio.
Mappatura dei ruoli
FastComments legge la claim LTI roles che Moodle invia ad ogni lancio e la mappa come segue:
- Moodle Manager o Site administrator -> FastComments admin
- Moodle Editing teacher o Non-editing teacher -> FastComments moderator
- Moodle Student -> FastComments commenter
- Moodle Guest -> sola lettura
Gli admin possono cancellare qualsiasi commento, bannare utenti e modificare le impostazioni del thread. I moderator possono cancellare e approvare i commenti all'interno del thread in cui sono entrati. I ruoli Moodle personalizzati ereditano la mappatura dall'archetipo da cui sono stati clonati.
Cosa vedono gli studenti
Gli studenti cliccano sull'attività FastComments (o scorrono fino al blocco incorporato dentro una Pagina o Book). Moodle invia la loro identità a FastComments tramite il lancio LTI:
- Nessuna schermata di login. FastComments li autentica usando l'account Moodle.
- Il loro nome visualizzato, email e avatar provengono da Moodle.
- Il thread è vincolato a
(Moodle site, course, resource link ID), quindi la stessa attività duplicata in un altro corso ottiene un thread nuovo. - Le risposte annidate, le votazioni e le notifiche funzionano come in un thread FastComments indipendente.
Limitare l'accesso pubblico (consigliato)
Per impostazione predefinita, i dati dei commenti FastComments sono leggibili pubblicamente. Chiunque possa indovinare l'URL di un thread o un endpoint API può visualizzarne i commenti, anche al di fuori di Moodle. Per le discussioni del corso quasi certamente vorrai limitare la visualizzazione agli studenti iscritti soltanto.
Apri la tua pagina di personalizzazione del widget e crea una regola con Require SSO To View Comments abilitato, quindi imposta il livello di sicurezza su Secure SSO in modo che i thread possano essere caricati solo tramite il lancio LTI firmato.
Vedi Proteggere i thread di commento con Single-Sign-On per la procedura completa, incluso come limitare la regola a un singolo dominio o pagina.
Problematiche di Moodle
FastComments non presente nel selettore di attività. L'amministratore del sito ha registrato lo strumento ma non ha impostato Tool configuration usage su Show in activity chooser and as a preconfigured tool. Correggi questo sotto Site administration > Plugins > Activity modules > External tool > Manage tools > icona a ingranaggio sulla tessera FastComments.
Il lancio fallisce o mostra un frame vuoto quando impostato su "Stessa finestra". I cookie di sessione di Moodle usano SameSite=Lax per impostazione predefinita e alcuni browser li rimuovono sulla POST cross-site che LTI 1.3 usa per il ritorno da FastComments. Imposta Launch container su Nuova finestra nell'attività. Questa è una richiesta stringente per i FastComments incorporati all'interno di una Pagina o Book, poiché il percorso di lancio incorporato dall'editor apre sempre una nuova finestra.
La claim iss è l'URL del sito Moodle, non un tenant ID. FastComments usa l'URL del sito Moodle (il valore di configurazione wwwroot) come issuer LTI. Se la tua istanza Moodle viene spostata su un nuovo dominio o cambi wwwroot, i thread FastComments esistenti rimangono legati al vecchio issuer e non corrisponderanno ai nuovi lanci. Registrare di nuovo lo strumento contro il nuovo URL e migrare i thread tramite l'admin di FastComments se necessario.
Backup e ripristino dell'attività. Effettuare il backup di un corso e ripristinarlo in un nuovo corso crea nuovi resource link ID, quindi le attività FastComments ripristinate iniziano con thread vuoti. Il corso originale mantiene i thread originali. Questo è un comportamento voluto, non un bug.
TinyMCE di default in Moodle 4.5. Moodle 4.5 viene fornito con TinyMCE come editor predefinito per le nuove installazioni. La posizione del pulsante Strumento esterno è sotto il menu Altro (...) invece che nella barra principale. I siti più vecchi che sono stati aggiornati dalla 4.1 mantengono Atto a meno che un amministratore non abbia cambiato il predefinito.
Aggiungi ai contenuti del corso in Blackboard
Una volta che un amministratore ha registrato FastComments come strumento LTI 1.3 Advantage e approvato le policy dell'istituzione, gli istruttori lo aggiungono ai corsi attraverso i punti di posizionamento standard di Blackboard. I passaggi esatti differiscono tra Ultra Course View e Original Course View, quindi entrambi sono coperti di seguito.
Ultra Course View
Ultra Course View è la visualizzazione predefinita in Blackboard Learn SaaS a partire dal 2026.
- Apri il corso e vai alla pagina Course Content.
- Posiziona il cursore o tocca dove vuoi che il thread dei commenti venga inserito nell'indice e clicca il pulsante viola + (Add content).
- Scegli Content Market. Il pannello Content Market elenca ogni strumento LTI approvato e i posizionamenti Building Block per la tua istituzione.
- Trova la tessera FastComments e cliccala. Blackboard crea un elemento di contenuto nella posizione in cui hai aperto il menu +.
- Per impostazione predefinita, l'elemento appare nell'indice come voce "Visible to students" per gli istruttori che hanno Hide from students disattivato come impostazione personale predefinita. Se il tuo default è Hidden, l'elemento viene creato nascosto e puoi attivare il selettore di visibilità sulla riga dell'elemento quando sei pronto.
- Per rinominare l'elemento, clicca il titolo nell'indice e digita una nuova etichetta. Il titolo che gli studenti vedono nell'indice è indipendente dall'identificatore del thread FastComments, quindi rinominare è sicuro in qualsiasi momento.
Se non vedi Content Market come opzione, la tua istituzione ha nascosto quel posizionamento. Puoi anche raggiungere lo stesso selettore tramite More tools nello stesso menu + sotto il gruppo LTI Tools.
Original Course View
Original Course View è ancora supportato in Learn SaaS e rimane l'esperienza principale per i siti Learn 9.1 self-hosted sulla linea di release CU Q4 2024.
- Apri il corso ed entra in un'area di contenuto (Content Area) (per esempio, l'area predefinita Information o Content nel menu del corso).
- Attiva Edit Mode con l'interruttore in alto a destra della pagina.
- Clicca Build Content nella barra delle azioni.
- Nel sottomenu Learning Tools, clicca FastComments. Il sottomenu Learning Tools viene popolato dai posizionamenti degli strumenti LTI 1.3 dopo che un amministratore ha registrato lo strumento. Se non lo vedi, consulta la sezione dei problemi noti qui sotto.
- Nel modulo Create FastComments, imposta:
- Name: l'etichetta che gli studenti vedono nell'area di contenuto.
- Description: testo opzionale mostrato sopra il thread incorporato.
- Permit Users to View this Content: interruttore di disponibilità Sì/No.
- Track Number of Views: abilita se desideri le statistiche di visualizzazione per elemento di Blackboard. FastComments gestisce le proprie analitiche in modo indipendente.
- Date and Time Restrictions: finestre opzionali Display After / Display Until.
- Invia. Lo strumento appare come elemento cliccabile nell'area di contenuto.
Embedding Inside an Item or Document
In entrambe le visualizzazioni del corso, gli istruttori incorporano FastComments inline all'interno del corpo di un Item, Document o di qualsiasi campo rich-text tramite il pulsante LTI Advantage dell'Editor di Contenuti.
Ultra Course View:
- Crea o modifica un Document.
- Clicca Add content all'interno del corpo del documento dove vuoi che appaia il thread.
- Nella barra degli strumenti dell'editor, apri il menu Insert content e clicca Content Market (il punto di ingresso LTI Advantage / Deep Linking).
- Seleziona FastComments. FastComments restituisce un payload di deep-link e Blackboard inserisce un blocco incorporato nel corpo del documento nella posizione del cursore.
- Salva il documento. Gli studenti vedono il thread renderizzato inline mentre scorrono la pagina.
Original Course View:
- Modifica qualsiasi elemento con un corpo rich-text.
- Nella barra degli strumenti dell'Editor di Contenuti, clicca l'icona più Add Content e scegli Content Market (etichettato Add Content from External Tool nelle CU Q4 2024 più datate).
- Seleziona FastComments. L'editor inserisce un blocco segnaposto che fa riferimento alla risorsa deep-linked.
- Invia l'elemento.
Ogni embed deep-link genera il proprio thread FastComments, quindi un Item con due blocchi FastComments incorporati avrà due flussi di commenti indipendenti.
Visibility, Release Conditions, and Group Restrictions
Gli elementi di contenuto FastComments si comportano come qualsiasi altro elemento di contenuto Blackboard per le regole di controllo accessi applicate su di essi.
- Ultra: clicca il selettore di visibilità sulla riga (Visible to students, Hidden from students, Conditional availability). La disponibilità condizionale supporta finestre di data/ora, regole basate sulle prestazioni rispetto ai criteri del gradebook e regole di appartenenza rispetto ai gruppi del corso.
- Original: apri il menu contestuale dell'elemento e scegli Adaptive Release o Adaptive Release: Advanced per limitare lo strumento per data, appartenenza, voto o stato di revisione. Usa Set Group Availability sull'elemento per limitarne l'accesso a specifici gruppi del corso.
FastComments rispetta qualunque limitazione decida Blackboard. Se Blackboard nasconde l'elemento a uno studente, il lancio LTI non avviene per quello studente e lui/lei non appare nella vista moderatore.
Gradebook Behavior
FastComments non invia voti tramite LTI Advantage Assignment and Grade Services. Nessuna colonna di voto viene creata automaticamente per gli elementi di contenuto FastComments.
Se il tuo tenant Blackboard è configurato per creare automaticamente una colonna del gradebook per ogni nuovo elemento di contenuto indipendentemente dai metadati di valutazione, appare comunque una colonna vuota. Per nasconderla:
- Ultra: apri il Gradebook, clicca l'intestazione della colonna, scegli Edit, e disattiva Show to students oltre a Include in calculations. Oppure usa Delete se la tua istituzione consente la cancellazione delle colonne per elementi non valutati.
- Original: apri il Grade Center, clicca sul chevron della colonna, scegli Hide from Users (on/off), e opzionalmente Hide from Instructor View sotto Column Organization.
What Students See
Quando uno studente apre l'elemento FastComments o scorri fino a un blocco incorporato:
- Blackboard avvia il messaggio LTI 1.3 verso FastComments. Lo studente viene autenticato tramite SSO usando la propria identità Blackboard (nome, email, avatar, ruolo) senza visualizzare un modulo di login.
- Il thread dei commenti viene renderizzato nell'iframe. Threading, risposte, menzioni e reazioni sono tutte disponibili in base alle impostazioni del widget dei commenti configurate in FastComments.
- I loro commenti sono attribuiti al loro account Blackboard. Se lo studente modifica il proprio nome o la foto in Blackboard successivamente, il lancio successivo aggiorna il profilo FastComments.
Mappatura dei ruoli da Blackboard a FastComments:
- System Administrator e Course Builder si mappano su FastComments admin.
- Instructor e Teaching Assistant si mappano su FastComments moderator.
- Student, Guest, e Observer si mappano su FastComments commenter.
I moderatori vedono i controlli di moderazione (pin, hide, ban, delete) inline su ogni commento nel thread.
Lock Down Public Access (Recommended)
Per impostazione predefinita, i dati dei commenti FastComments sono leggibili pubblicamente. Chiunque possa indovinare l'URL di un thread o un endpoint API può visualizzare i suoi commenti, anche al di fuori di Blackboard. Per le discussioni di corso quasi certamente vorrai limitare la visualizzazione solo agli studenti iscritti.
Apri la tua pagina di personalizzazione del widget e crea una regola con Require SSO To View Comments abilitato, quindi imposta il livello di sicurezza su Secure SSO in modo che i thread possano essere caricati solo tramite il lancio LTI firmato.
Vedi Protecting Comment Threads With Single-Sign-On per la procedura completa, incluso come limitare la regola a un singolo dominio o pagina.
Thread Scoping
FastComments scopa ogni thread per (Blackboard host, course ID, resource link ID). Due elementi FastComments nello stesso corso producono due thread. Lo stesso elemento copiato in due istanze del corso (per esempio, tramite course copy) produce due thread, perché Blackboard emette un nuovo resource link ID durante la copia. Per mantenere un thread condiviso attraverso le copie del corso, usa Deep Linking con un URN di thread esplicito configurato in FastComments prima di eseguire la copia.
Blackboard-Specific Gotchas
FastComments tile missing from the Build Content menu (Original) or Content Market (Ultra). L'amministratore ha approvato lo strumento ma ha lasciato una policy dell'istituzione che blocca il posizionamento pertinente. Vai su Administrator Panel > Integrations > LTI Tool Providers, modifica la voce FastComments e conferma che siano abilitati i posizionamenti Course Content Tool (Original) e Course Content Tool - allow students / Deep Linking content tool (Ultra). Salva e aggiorna la pagina del corso.
"Tool not configured for this context" or "Tool is not deployed" error on launch. L'ambito di deployment registrato durante la registrazione dinamica non corrisponde al contesto dell'istituzione a cui appartiene il corso. Nella voce del tool provider di Blackboard, verifica che il Deployment ID corrisponda a quello mostrato da FastComments nella sua pagina di configurazione LTI 1.3 per questo tenant. Se differiscono, elimina il posizionamento e riesegui la registrazione dinamica da un URL di registrazione nuovo (ottienilo qui).
Iframe height looks fixed or content gets cut off. Alcuni tenant Blackboard distribuiscono una Content Security Policy restrittiva che blocca il postMessage di ridimensionamento iframe LTI predefinito. FastComments emette sia il messaggio in stile Canvas lti.frameResize sia il messaggio conforme alla specifica IMS org.imsglobal.lti.frameResize per massimizzare la compatibilità, ma un override CSP a livello di tenant blocca il listener lato padre. Chiedi al tuo amministratore di confermare che *.fastcomments.com sia nella allowlist degli strumenti LTI e che nessun header CSP personalizzato stia rimuovendo gli eventi postMessage. Il ridimensionamento funzionerà poi senza ulteriore configurazione.
Course copy duplicates threads. La copia del corso di Blackboard emette nuovi resource link ID per i posizionamenti LTI, quindi i corsi copiati iniziano con thread vuoti. Questo è previsto. Se hai bisogno che il corso copiato erediti il thread originale, configura il Deep Linking con un URN di thread esplicito prima della copia, oppure contatta il supporto FastComments per rimappare gli ID dei thread in blocco.
Student sees a generic Blackboard error on launch. La causa è una claim email mancante o obsoleta. Conferma che la policy dell'istituzione per FastComments abbia abilitati Role, Name, e Email Address sotto User Fields to Send. Salva, quindi rilancia in una nuova sessione del browser.
Aggiungi ai contenuti del corso in Sakai o Schoology
Una volta che FastComments è registrato sulla piattaforma, gli istruttori lo aggiungono ai contenuti del corso usando i flussi standard per strumenti esterni della piattaforma. Questa pagina copre Sakai 23.x e Schoology Enterprise.
Limitare l'accesso pubblico (consigliato)
Per impostazione predefinita, i dati dei commenti di FastComments sono leggibili pubblicamente su entrambe le piattaforme. Chiunque riesca a indovinare l'URL di un thread o un endpoint API può visualizzarne i commenti, anche al di fuori di Sakai o Schoology. Per le discussioni di corso quasi certamente vorrete limitare la visualizzazione solo agli studenti iscritti.
Apri la tua pagina di personalizzazione del widget e crea una regola con Richiedi SSO per visualizzare i commenti abilitata, quindi imposta il livello di sicurezza su SSO protetto in modo che i thread possano essere caricati solo tramite il lancio LTI firmato.
Vedi Proteggere i thread di commento con Single-Sign-On per la guida completa, inclusa la modalità di limitazione della regola a un singolo dominio o pagina.
Sakai
1. Aggiungere FastComments a un sito
Il manutentore del sito abilita lo strumento per ciascun sito:
- Apri il sito e clicca Informazioni sito nella navigazione a sinistra.
- Clicca Gestisci strumenti.
- Scorri fino all'elenco Strumenti esterni e attiva FastComments.
- Clicca Continua, controlla l'elenco degli strumenti, quindi clicca Fine.
FastComments ora appare come voce nella navigazione a sinistra del sito.
2. Riordinare la voce nella navigazione a sinistra
Vai a Informazioni sito > Ordine strumenti. Trascina FastComments nella posizione desiderata e clicca Salva. Da questa schermata puoi anche rinominare l'etichetta di navigazione e nasconderla agli studenti.
3. Incorporare inline in una pagina Lessons
Per posizionare FastComments direttamente all'interno di una pagina Lessons anziché come strumento a sé stante nella navigazione a sinistra:
- Apri lo strumento Lessons nel sito.
- Clicca Aggiungi contenuto > Aggiungi strumento esterno.
- Seleziona FastComments dall'elenco.
- Se FastComments ha pubblicizzato Deep Linking durante la registrazione, Sakai apre il selettore di contenuti dello strumento in modo da poter scegliere o etichettare il thread. Se Deep Linking non è stato pubblicizzato, Sakai inserisce un link di avvio predefinito.
- Salva l'elemento Lessons.
Ogni istanza incorporata ottiene il proprio thread, limitato a quel link di risorsa.
4. Regolazioni dei permessi per l'accesso degli studenti
Sakai regola i lanci degli strumenti esterni tramite i Realms. Per confermare che gli studenti possano avviare FastComments:
- Accedi come amministratore Sakai e apri Area di amministrazione > Realms.
- Apri il realm pertinente (per esempio,
!site.template.courseo il realm specifico del sito). - Conferma che il ruolo
accessabbialti.launchabilitato e che i permessi di ruolo nel gruppo external.tools siano concessi. - Salva il realm.
Per override a livello di sito, il manutentore può regolare la visibilità dello strumento per ruolo da Informazioni sito > Ordine strumenti nascondendo o mostrando FastComments per ruolo.
5. Cosa vedono gli studenti
Gli studenti cliccano la voce FastComments nella navigazione a sinistra (o scorrono fino al blocco Lessons incorporato) e approdano direttamente nella vista a thread dei commenti. L'SSO è automatico: Sakai invia l'identità dell'utente nel lancio LTI e FastComments li autentica con il loro account Sakai.
Mappatura dei ruoli:
- Sakai
Instructor-> moderatore FastComments - Sakai
Admin(admin in Area di amministrazione) -> amministratore FastComments - Sakai
Student/access-> commentatore FastComments
6. Problemi comuni in Sakai
- Tool non visibile in Gestisci strumenti. Se FastComments non appare nell'elenco Strumenti esterni, l'amministratore Sakai deve aprire il registro strumenti (Area di amministrazione > Strumenti esterni > FastComments) e impostare Stealthed su
false. Gli strumenti stealthed sono nascosti dal selettore Gestisci strumenti per sito. - Lanci che si interrompono in browser con sessioni condivise. Il token CSRF del portale Sakai è legato alla sessione del browser. Se uno studente è connesso a due siti Sakai in tab diversi o ha una sessione scaduta, il lancio restituisce un 403. Soluzione: chiudere gli altri tab Sakai, disconnettersi, riconnettersi e rilanciare. Gli amministratori possono anche aumentare
sakai.csrf.token.cache.ttlse questo si verifica a livello di cluster. - Incorporamento in frame. Conferma che
lti.frameheightinsakai.propertiessia sufficientemente grande (600 o superiore) in modo che il thread di commenti non venga tagliato all'interno di una pagina Lessons.
Schoology
Schoology Enterprise prevede due scenari di installazione. Conferma quale si applica prima di aggiungere lo strumento a un corso.
1. Due scenari di installazione
- (a) Installazione a livello aziendale. L'Amministratore di sistema di Schoology ha installato FastComments a livello organizzazione e lo ha assegnato a tutti i corsi o a specifici template di corso. Gli istruttori saltano l'installazione e vanno direttamente a Aggiungi materiali.
- (b) Installazione autonoma da parte dell'istruttore. L'istruttore installa lo strumento in un singolo corso da Opzioni corso > Strumenti esterni > Installa app LTI. L'installazione autonoma richiede che l'Amministratore di sistema abbia prima approvato l'app FastComments a livello organizzativo.
2. Aggiungere FastComments come materiale del corso
All'interno del corso:
- Apri il corso e vai a Materiali.
- Clicca Aggiungi materiali > Aggiungi File/Link/Strumento esterno.
- Scegli Strumento esterno.
- Seleziona FastComments dall'elenco degli strumenti registrati.
- Imposta un Nome (è ciò che gli studenti vedono nell'elenco dei materiali) e un'eventuale Descrizione.
- Lascia Abilita valutazione (grade passback) DISATTIVATO. FastComments non riporta voti a Schoology, quindi abilitare il grade passback crea una colonna vuota nel registro voti.
- Clicca Invia.
Il materiale ora appare nell'elenco dei materiali del corso e apre il thread FastComments quando viene cliccato.
3. Incorporamento inline tramite l'editor Rich Text
Se l'Amministratore di sistema ha abilitato il posizionamento Deep Linking per FastComments durante la registrazione, gli istruttori possono incorporare il thread di commenti all'interno di qualsiasi campo Rich Text (istruzioni dell'assegnazione, corpi delle pagine, prompt di discussione):
- Apri l'editor Rich Text sulla pagina di destinazione.
- Clicca l'icona External Tool (pezzo di puzzle) nella barra degli strumenti.
- Scegli FastComments.
- Configura l'incorporamento nella finestra di dialogo deep-linking e clicca Inserisci.
- Salva la pagina.
Se il pulsante External Tool non appare nell'editor Rich Text, Deep Linking è disabilitato per questo strumento in questo tenant. Vedi i problemi noti qui sotto.
4. Visibilità e assegnazioni per sezione
Schoology limita la disponibilità dello strumento per sezione tramite le Opzioni corso:
- Dal corso, clicca Opzioni corso > Strumenti esterni.
- Per ciascuna app LTI installata, puoi controllare se è disponibile per tutte le sezioni del corso o per sezioni specifiche.
- Per limitare FastComments a determinate sezioni, deseleziona le sezioni che non dovrebbero vedere lo strumento.
- L'accesso a livello di sezione determina anche quali sezioni vedono la voce Aggiungi materiali > Strumento esterno per FastComments.
5. Cosa vedono gli studenti
Gli studenti cliccano il materiale FastComments (o scorrono fino all'incorporamento inline) e accedono alla discussione a thread. L'SSO è automatico tramite il lancio LTI di Schoology con il loro account Schoology.
Mappatura dei ruoli:
- Schoology
Administrator-> amministratore FastComments - Schoology
Instructor-> moderatore FastComments - Schoology
Student-> commentatore FastComments
6. Problemi comuni in Schoology
- Solo Enterprise. Gli account personali e gratuiti di Schoology non possono installare strumenti LTI 1.3. Se il tuo tenant è nel piano gratuito, l'opzione Strumenti esterni è assente dalle Opzioni corso. Effettua l'upgrade a Schoology Enterprise per usare FastComments.
- Deep Linking disabilitato per impostazione predefinita dal tenant. Alcuni tenant Schoology limitano il posizionamento Deep Linking a livello organizzazione. In questo caso, gli istruttori vedono solo il flusso Aggiungi materiali > Strumento esterno e non il pulsante External Tool nell'editor Rich Text. Per abilitare l'incorporamento inline, l'Amministratore di sistema va su Impostazioni di sistema > Integrazione > LTI 1.3 > FastComments, abilita il posizionamento Content Item / Deep Linking, quindi salva.
- Override di assegnazione per sezione. Se FastComments è assegnato a livello enterprise ma l'istruttore non lo vede in Aggiungi materiali, la sezione del corso è esclusa nell'assegnazione a livello organizzazione. Chiedi all'Amministratore di sistema di aggiungere la sezione all'assegnazione dell'app FastComments.
- Nome del materiale vs. identità del thread. Rinominare il materiale in Schoology non sposta il thread di commenti. I thread sono indicizzati sull'ID del link di risorsa LTI, quindi una rinomina mantiene lo stesso thread; eliminare e ricreare il materiale crea un nuovo thread vuoto.
Risoluzione dei problemi
"Token di registrazione non trovato, scaduto o già utilizzato"
Il token nell'URL di registrazione (recuperalo qui) è valido per 30 minuti e può essere usato una sola volta. Se il tuo LMS ha impiegato più tempo, o se la registrazione è stata ripetuta dopo un successo, il token verrà rifiutato. Genera un nuovo URL nella pagina di configurazione LTI 1.3 di FastComments e riprova.
"Platform rejected registration"
Il tuo LMS ha rifiutato l'handshake di registrazione. Le cause più comuni:
- Tool already registered with the same client name. Alcune piattaforme (in particolare D2L) rifiutano una seconda registrazione di "FastComments" finché quella precedente non viene eliminata. Rimuovi il vecchio tool nel tuo LMS, quindi riprova.
- Wrong field in the LMS. Assicurati di aver incollato l'URL nel campo registration / tool initiation registration endpoint, non nel campo launch URL o login URL.
- The LMS doesn't actually support Dynamic Registration. Versioni più vecchie di Moodle e Blackboard dichiarano il supporto per LTI 1.3 ma consentono solo la configurazione manuale. Controlla la documentazione della tua piattaforma.
"Failed to fetch platform configuration"
FastComments non è riuscito a leggere il documento openid-configuration del tuo LMS. È raro e di solito significa che il LMS ha fornito un URL di discovery malformato o non raggiungibile. Contatta il supporto del tuo LMS.
Launch shows "Configuration not found"
O la configurazione in FastComments è stata eliminata, oppure l'avvio proviene da una coppia iss/client_id che non riconosciamo. Se hai eliminato e poi registrato di nuovo, istruisci il tuo LMS a rimuovere e riaggiungere lo strumento FastComments in modo che ottenga il nuovo client_id.
Launch shows "Deployment not registered"
Hai avviato FastComments da una deployment di Brightspace/Moodle/Blackboard diversa da quella in cui è stato lanciato inizialmente. FastComments fissa il deployment_id al primo avvio come controllo di sicurezza. Per aggiungere una nuova deployment sotto lo stesso client, contatta il supporto - aggiungeremo il deployment ID alla configurazione.
Launch shows "Unsupported message_type"
Il LMS ha inviato un messaggio LTI che FastComments non gestisce (es. LtiSubmissionReviewRequest). FastComments supporta solo l'avvio standard resource-link e i flussi di deep-linking. Contattaci se hai bisogno che venga aggiunto un tipo di messaggio specifico.
Iframe doesn't resize
La maggior parte dei LMS ridimensiona automaticamente gli iframe LTI. Se il tuo non lo fa, verifica che le impostazioni di avvio del LMS permettano allo strumento di inviare eventi postMessage al frame padre. FastComments emette sia messaggi di ridimensionamento in stile Canvas (lti.frameResize) sia secondo la specifica IMS (org.imsglobal.lti.frameResize) di resize.
Privilegio minimo e minimizzazione dei dati
The FastComments LTI 1.3 integration segue il principio del privilegio minimo: utilizza solo le claim di launch necessarie per identificare l'utente, associare i commenti al corso e alla risorsa corretti e applicare permessi basati sui ruoli.
Il resto di questa pagina mappa ogni claim consumata dall'integrazione, ogni servizio LTI Advantage che non richiede e ogni categoria di dati che non raccoglie. I revisori di sicurezza e acquisti possono prelevare le risposte direttamente dalle tabelle sottostanti.
Data Elements Received From the LMS
Every LTI 1.3 launch carries a signed JWT from the LMS. FastComments extracts the following claims from that JWT and uses nothing else:
| Campo | Claim LTI | Scopo | Obbligatorio | Memorizzato |
|---|---|---|---|---|
| Identificatore utente | sub | Identifica l'utente in modo coerente tra i lancio in modo che la stessa persona corrisponda allo stesso utente SSO di FastComments | Sì | Sì, come parte di un ID SSO interno stabile |
| Nome visualizzato | name | Attribuzione mostrata accanto ai commenti dell'utente | Sì (fa fallback a "Utente LMS" se assente) | Sì |
email | Corrispondenza account, notifiche, moderazione, corrispondenza di supporto | Facoltativa (l'integrazione funziona senza) | Sì quando fornita | |
| URL avatar | picture | Visualizzato nei commenti dell'utente | Facoltativo | Solo URL; FastComments non scarica né ri-ospita l'immagine |
| Ruoli | https://purl.imsglobal.org/spec/lti/claim/roles | Determina se l'utente è amministratore, docente (moderatore) o studente | Sì | Flag derivati isAdmin / isModerator sulla sessione SSO |
| Contesto del corso | https://purl.imsglobal.org/spec/lti/claim/context (id, title) | Associa il thread di commenti al corso LMS corretto | Sì | Sì, come parte dell'identificatore di pagina risolto |
| Collegamento alla risorsa | https://purl.imsglobal.org/spec/lti/claim/resource_link (id) | Associa i commenti all'attività o alla collocazione dello strumento corretta all'interno del corso | Sì quando presente | Sì, come parte dell'identificatore di pagina risolto |
| Deployment ID | https://purl.imsglobal.org/spec/lti/claim/deployment_id | Instrada il launch alla configurazione tenant FastComments corretta | Sì | Sì, nel record di configurazione LTI di FastComments |
Claims and Scopes Declared at Registration
During LTI 1.3 Dynamic Registration, FastComments registers itself with scope: "" (no additional OAuth scopes) and declares only these OpenID Connect claims:
iss, sub, name, email, picture
It registers two message types:
LtiResourceLinkRequest- the standard course launch into FastComments.LtiDeepLinkingRequest- allows instructors to place the FastComments tool inside a course.
No additional access tokens are requested from the LMS.
LTI Advantage Services Not Requested
| Service / scope | Requested? | Reason |
|---|---|---|
| Names and Role Provisioning Services (NRPS) | No | The integration does not need a course roster; user identity arrives with each launch |
| Assignment and Grade Services (AGS) - lineitem, score, result scopes | No | The integration is not gradebook-aware |
| Deep Linking beyond the standard placement return | No additional data | Deep linking is used only for instructor placement of the tool; no course content is enumerated |
Data Not Collected
Beyond LTI itself, FastComments does not request or receive the following from the LMS or user:
| Categoria | Raccolti? |
|---|---|
| Voti degli studenti | No |
| Invii delle assegnazioni | No |
| Registri di presenza | No |
| Elenchi completi del corso | No |
| Identificatori governativi | No |
| Data di nascita | No |
| Indirizzo postale o numero di telefono | No |
| Informazioni finanziarie | No |
| Credenziali amministratore LMS | No |
Access Boundaries
- FastComments only receives data inside an authorized LTI 1.3 launch signed by the LMS's registered keys. The integration does not call back into the LMS for additional information.
- Launch tokens are single-use and short-lived. Replayed or expired tokens are rejected.
- LMS administrators control where the tool is deployed inside their platform. D2L Brightspace, for example, supports per-deployment org-unit scoping and per-deployment security settings, which allows administrators to restrict the tool to specific courses or org units rather than making it available globally. Moodle, Blackboard, Sakai, and Schoology offer equivalent per-deployment controls in their LTI 1.3 implementations.
Storage and Retention
FastComments retains LTI-derived data for the duration of the active commenting service and according to customer-configured retention settings. Comment data is stored in encrypted-at-rest production storage. On account termination or written deletion request, FastComments deletes or anonymizes customer data per the applicable agreement.
For full storage and data-handling details, see the FastComments Privacy Policy.
Review Cadence
Any new LTI feature that would require additional claims, scopes, or LTI Advantage services is reviewed before release to confirm the requested access is necessary and proportionate to the feature being shipped.
Short Statement for Security Questionnaires
FastComments applies least privilege and data minimization to its LTI 1.3 integration. The integration uses only the LTI launch claims required to authenticate the user (
sub,name,picture), determine their role, and identify the course and resource that comments belong to. FastComments does not request Names and Role Provisioning Services, Assignment and Grade Services, gradebook data, attendance, full rosters, or LMS administrative access. LMS administrators retain control over which org units, courses, and deployments the tool is available in.